声明:本文档仅为个人学习过程中顺手翻译之作,方便开发的同胞借鉴参考。如有觉得译的不好不到位的地方,欢迎指正,将及时做出更正
|
@interface ClassName : ItsSuperclass |
// Method and property declarations. |
@end |
第一行声明标示一个新类名并将其与它的父类联系起来。父类定义了新类在继承树中的位置,就像我们在“Inheritance.” 中讨论的那样。
类的方法以及属性定义在之后,类声明结尾处的前面。能被类对象使用的方法名,即类方法,方法前面会有个加号标记;
+ alloc; |
为类的实例使用的方法,即实例方法,方法前会有一个减号标记。;
- (void)display; |
尽管这不是什么惯例,你也可以给类方法和实例方法定义一样的名字。方法也可以跟实例变量名字相同,这更常见,尤其是当方法在变量中返回值时。例如, Circle 有一个 radius 方法与 radius 实例变量相匹配。
方法的返回值类型的名声使用的是标准的C语法:
- (float)radius; |
参数的类型定义也是一样的:
- (void)setRadius:(float)aRadius; |
如果一个返回值或者参数类型没有显示的被声明,那么它会假定默认类型为id。早前讲到过的 alloc 方法会返回 id.
当有更多的参数时,所有的参数会声明在方法名内,在冒号的后面。例如:
- (void)setWidth:(float)width height:(float)height; |
有较多参数的方法,在声明这些参数时使用逗号以及省略号,就像函数那样:
- makeGroup:group, ...; |
属性声明的格式是:
@property (attributes) Type propertyName; |
更多关于属性声明的信息可以参考 “Declared Properties.”
注意: 过去,接口还要求类的实例变量的声明,数据构造器是每个类实例的一部分。它们定义在 @interface 声明后面的大括号离,方法声明之前。
@interface ClassName : ItsSuperclass |
{
|
// Instance variable declarations. |
} |
// Method and property declarations. |
@end |
接口文件必须被包含在任何依赖这个类接口的源码模块中,即任何需要为这个类创建实例的模块,发送一个消息来调用为这个类声明的方法,或者使用定义在类中的实例变量。接口通常包含在 #import 指令中
#import "Rectangle.h" |
这个指令跟 #include的作用是一样的,唯一的区别是这条指令可以确保同一个文件不会被导入多次。因此在Objective-C的基础文档中的例子大多使用这个指令。
为了反映一个类的定义是建立在所继承的类的定义基础上,那么这个接口文件就以导入父类的接口开始。
#import "ItsSuperclass.h" |
|
|
@interface ClassName : ItsSuperclass |
// Method and property declarations. |
@end |
这个惯例说明,每个接口文件都间接的包含所有继承的类的接口文件。当一个源文件模块导入一个类接口时,它同时也获得了整个接口树中的接口。
如果有一个 precomp—一个预编译头文件—支持父类,你可能会更愿意导入预编译的文件。
当一个接口文件声明了一个类,导入了它的父类,显示包含了所有继承到的类的声明,从NSObject 开始一直到它的父类。如果接口引用了不在它继承树中的类,它就必须显示的导入它们或者用@class 指令声明它们
@class Rectangle, Circle; |
这个指令简单的通知编译器, “Rectangle” 跟 “Circle” 是类名,没有导入它们的接口文件。
在接口文件中,当它静态的给实例变量,返回值以及参数赋予类型时,用到了类名
- (void)setPrimaryColor:(NSColor *)aColor; |
引用了 NSColor 类.
因为向这样声明只是简单将类名用作赋予类型,并不依赖任何接口的详情 (它的方法和实例变量), @class 指令已经可以为编译器提供足够的有关编译器能够获得什么信息预警。但是,当类的接口真正使用时(实例创建时,发送消息时),
此时类接口就必须被导入。通常接口文件会使用 @class 指令来生命类, 而真正的响应的实现文件会导入它们的接口(因为它需要为这些类创建实例并给它们发消息)。@class 指令将给编译器以及链接器看的代码量最小化
, 同时也是最简单的方式来提供类名的前置声明。让事情变的简单,它可以有效避免导入的文件本身还导入了别的文件时可能出现的潜在问题。例如,当一个类声明了两外一个类的一个静态类型的实例变量,并且他们的两个接口文件相互导入,这种情况下可能两个类都无法正确编译。
接口文件的职责是为其它源代码模块(以及其它程序猿)声明新类。包含它们的类协同工作需要的一些信息 (程序猿可能比较喜欢还有点文档).
接口文件告诉用户类是怎么接入继承树的,以及需要用到的其它的类,继承的或者在类中某个位置引用到的。
通过它的方法声明列表,接口文件让其它模块知道什么样的消息可以发送给类对象以及类的实例。每个能在类声明外部使用的方法都声明在接口文件中。实现类内部使用的方法可以忽略
@implementation 指令开始, @end 指令结束.
另外,类还可能会在@implementation 指令后面的大括号中声明实例变量:
@implementation ClassName
|
{
|
// Instance variable declarations.
|
}
|
// Method definitions.
|
@end
|
实例变量通常都有声明的属性来指定 (可以参考 “Declared Properties”). 如果你没有额外的实例变量要声明,那么你可以忽略上面提到的大括号。
@implementation ClassName |
// Method definitions. |
@end |
注意: 每个实现文件都必须导入它自己的接口。例如Rectangle.m 类要导入Rectangle.h. 因为实现不需要重复任何它导入的声明,它可以安全的忽略父类的名字。
类的方法的定义,就像C函数一样,有一堆大括号。在大括号前面,它们的声明跟接口文件中的习惯一样,但没有分号。例如:
+ (id)alloc {
|
... |
} |
- (BOOL)isFilled {
|
... |
} |
- (void)setFilled:(BOOL)flag {
|
... |
} |
有多个参数的方法的处理方式就像函数那样就可以了:
#import <stdarg.h> |
... |
- getGroup:group, ... {
|
va_list ap; |
va_start(ap, group); |
... |
} |
默认情况下,实例方法的定义会拥有这个对象所在域的所有实例变量。 它可以简单的通过名字来引用它们。尽管编译器创建了完全等价于C的构造器来存储实例变量,但构造器的具体形态被隐藏了。你不需要任何一个构造运算符(.或者->)来引用对象的数据。例如这个方法定义引用了receiver的 filled 实例变量。
- (void)setFilled:(BOOL)flag |
{
|
filled = flag; |
... |
} |
接收对象跟它的 filled 实例变量都没有被声明成这个方法的一个参数,然而这个实例变量还是在它的作用域内。这种方法语法的简化在Objective-C 代码书写中是一种有效的速记方式.
当实例变量属于的对象不是receiver的,对象的类型必须通过静态赋予类型显式的呈献给编译器。在引用一个赋予静态类型的对象的实例变量时,将使用构造指针运算符(->) 。
假设, Sibling 类声明了一个赋予静态类型的对象, twin, 作为实例变量:
@interface Sibling : NSObject |
{
|
Sibling *twin; |
int gender; |
struct features *appearance; |
} |
只要赋予静态类型的对象的实例变量,在类的有效域内,(就像在这里看到的,twin被赋予了跟类一样的类型),
Sibling 方法就可以直接设置它们:
- makeIdenticalTwin |
{
|
if ( !twin ) {
|
twin = [[Sibling alloc] init]; |
twin->gender = gender; |
twin->appearance = appearance; |
} |
return twin; |
} |
如果向要对象隐藏它的数据,编译器可以限制实例变量的作用域—即,限制它们在程序中的可见度。但为了提供良好的可伸缩性,它同时允许你显式的把作用域设置为4个等级,每个等级都有对应的编译器指令。
|
指令 |
含义 |
|---|---|
|
|
实例变量仅在声明它的类中可被访问。 |
|
|
实例变量在声明它的类中以及继承它的子类中可被访问。如果一个实例变量没有任何显式的声明指令, |
|
|
实例变量随处都可以被访问 |
|
|
使用modern 运行时,(modern跟legacy runtime相关介绍可以参考此文),一个
这种作用域在框架类中的实例变量很有用,在这种地方 |
图 2-1 向我们展示了实例变量的四个级别
图 2-1 实例变量的作用域 (@package 作用域没有展示)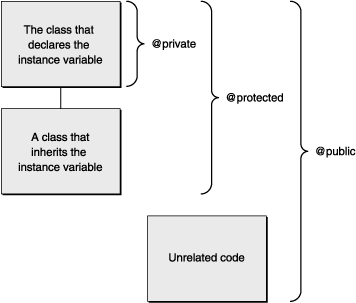
一个作用域指令可以作用到它后面的所有实例变量列表,直到下一个指令出现,或者列表结束。下面的例子中, age 和 evaluation 实例变量是私有的; name, job,
和 wage 是 protected; boss 是公开的.
@interface Worker : NSObject |
{
|
char *name; |
@private |
int age; |
char *evaluation; |
@protected |
id job; |
float wage; |
@public |
id boss; |
} |
默认情况下,没有标识的实例变量比如上面的 name,默认为 @protected.
类声明的所有实例变量,无论它们的标识是什么,都在类定义的作用域之内。例如,一个类声明了一个 job 实例变量,例如上面的 Worker 类,可以在一个方法定义中引用它。
- promoteTo:newPosition |
{
|
id old = job; |
job = newPosition; |
return old; |
} |
显然,如果一个类不能访问它自己的实例变量,那么这个实例变量将毫无用处。
通常,一个类也会访问它继承的实例变量。这种引用实例变量的能力通常与变量以其被继承。类拥有它们作用域内的完整数据结构,这点很有意义,尤其是当你想要一个类的定义像继承来的类一样精巧时。早前提到过的 promoteTo: 方法跟定义在任何类中一样,从 Worker 类中集成到了 job 实例变量。
但是,有时候你可能想要严格限制子类直接获取实例变量:
一旦子类访问了一个实例变量,那么声明这个变量的类就跟它的实现绑定到一起。在以后的版本中,就不能清除这个变量或者改变它的职能而不会无意中破坏了子类。
此外,当子类访问一个继承的实例变量并修改了它的值,它可能在声明这个变量的类中引入一个bug, 尤其是在构造器中引用变量时.
要将实例变量作用域限制在声明它的类中,你就应该使用 @private. 子类要想访问父类中 @private 声明的实例变量,就必须通过调用声明在父类中的公开的方法(该方法中提供了访问私有方法的途径),当然前提是这种共有方法存在。
另一种极端是把变量标识为 @public , 让它随处都可被访问。通常,要想获得的存储在实例变量中的信息,其它对象必须给它发消息请求。但公有实例变量可以随处访问。就像C结构中的字段一样。例如
Worker *ceo = [[Worker alloc] init]; |
ceo->boss = nil; |
要注意的是对象必须是被静态赋予类型的。
将实例变量标识为@public 破坏了对象隐藏自身数据的能力。这与面向对象编程的基本思想背道而驰—使用对象对数据进行封装,可以有效避免查看跟一些无意的错误。应当尽量避免公有实例变量除非确实必要。
给self 跟 super发消息
Objective-C 提供了两个元素,可以用在方法定义中来引用执行这个方法的对象—self 跟 super.(有点绕,呵呵,看的明白不)
例如,你定义了一个reposition 方法,它需要在object做任何动作时改变坐标。它可以调用 setOrigin:: 方法来改变坐标,你需要做的是发送一个setOrigin:: 给消息给一个对象,这个对象就是 reposition 消息自身的发送对象。当你在写
reposition 代码时, 你可以通过 self 或者 super
来引用刚提到的对象。
- reposition |
{
|
... |
[self setOrigin:someX :someY]; |
... |
} |
或者:
- reposition |
{
|
... |
[super setOrigin:someX :someY]; |
... |
} |
这里的 self 跟 super 都引用的是接收reposition 消息的对象。然而这两个东东还是有很大区别的. self 是消息例程传送给每个方法的一个隐藏参数。它是一个本地变量,并可以在一个方法实现中自由的使用。super 只有作为消息表达式的接收器时才能替代self 。作为接收器,这两个东东的主要区别在于它们是如何影响消息进程的:
self 按照常规搜索方法实现,开始于接收对象的类的派发表中。在上面的例子中,开始于接收 reposition 消息的对象的类.
super 是一个标识,它告诉编译器去到一个完全不同的地方去查找这个方法实现。它开始于定义了含有 super 的方法的类的父类中。(真心绕啊 ).
在上面的例子中,它开始于定义 reposition 的类的父类中.
).
在上面的例子中,它开始于定义 reposition 的类的父类中.
只要 super 收到一条消息,编译器就会用另外一个消息例程来替代objc_msgSend 函数. 替代例程直接查找定义类的父类,即发消息给super的类的父类—而不是接收消息的对象的类。
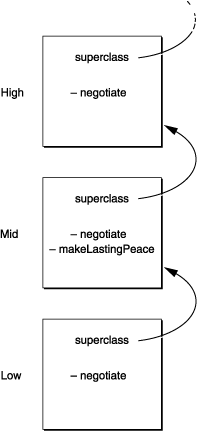
当我们使用有继承关系的3个类时,self 跟 super 的区别将变的很清楚。假如,我们创建一个属于 Low 类的对象, Low 类的父类是 Mid;Mid 的父类是 High.
三个类都定义了一个方法叫做 negotiate, 每个类都处于自己的考虑去使用这个方法。另外, Mid 类定义了一个NX的方法叫做 makeLastingPeace,
这个方法用到了 negotiate方法. 上面提到的方法和类可以在图 2-2 中看到
假设在 makeLastingPeace 方法实现中( Mid 类中) 使用 self 来只带发送 negotiate 消息的对象:
- makeLastingPeace |
{
|
[self negotiate]; |
... |
} |
当一条发给了 Low 对象以执行 makeLastingPeace 方法, makeLastingPeace 会发哦那个一条negotiate 消息给相同的 Low 对象.
消息例程找到了定义在Low中的 negotiate 版本,
self的类.
但是,如果 makeLastingPeace 的实现使用super 来作为接收器,
- makeLastingPeace |
{
|
[super negotiate]; |
... |
} |
消息例程发现了定义在 High中定义的 negotiate 版本.
而将接收 makeLastingPeace 消息的对象的类(Low)
忽略掉并直接跳到父类Mid 中, 因为makeLastingPeace是定义在 Mid 中的.
实现也没有找到 Mid 版本的 negotiate.
在这个例子中, super 提供了一种绕过某个方法的途径。这里,我们使用 super 以使 makeLastingPeace 绕过 Mid 中覆写了父类版本的 negotiate 的方法。
无法获取 Mid 版本的 negotiate 方法,可能看起来像个缺陷,但在某些环境下,它是有意为之的:
Low 类的作者故意覆写了 Mid 版本的negotiate 方法,所以 Low (以及其子类)
的实例将调用覆写版本的方法。 Low 的设计者并不像 Low对象执行继承来的方法。
Mid 的方法 makeLastingPeace 方法的作者,在发送 negotiate 消息给 super (就像在第二个实现中展示的),
故意跳过了 Mid 版本的negotiate (以及任何定义在继承了 Mid
的类似 Low 的类) 以执行定义在 High 类中的版本. 第二个makeLastingPeace 实现的设计者希望使用 High 中定义的 negotiate 版本而不是别的类中的。
Mid 版本的 negotiate 仍可以使用,但需要发送一个直接的消息给 Mid 实例来达到这个目的;
发送给 super 的消息允许方法实现被分发给多个类。你可以覆写一个已经存在的方法来增加或者修改一些东西。并在修改中结合原始方法。
- negotiate |
{
|
... |
return [super negotiate]; |
} |
对于一些任务来说,继承关系中的每一个类都可以实现一个方法,这个方法会做一部分工作并把消息传给 super 完成剩下的. 能够初始化新分配的实例
的init 方法,就是设计用来像这样工作的。每个 init 方法都有自己初始化定义在类中的实例变量的职责。但在做这些之前,它要发送一个 init 消息给super 来获取继承来的类并实例化它们的实例变量。每个版本的 init 都遵循这个流程,所以类都是按照继承顺序来初始化它们的实例变量的。
- (id)init |
{
|
self = [super init]; |
if (self) {
|
... |
} |
} |
我们也可以关注定义在父类中的某一个方法的核心功能,并让子类把这个方法通过 super并入这个方法。例如,每个创建实例的类方法都必须为新对象分配存储单元并初始化它类构造器的 isa 变量.
分配通常留下给定义在NSObject 类中的 alloc和 allocWithZone: 方法来做。如果两外一个类覆写了这些方法 (一种少见的情况),
它仍然可以通过发送消息给super获取基础功能。
super 只是一个简单的标识,告诉编译器应该从哪里查找要执行的方法。它仅用于消息的接收器。但 self 则是一个变量名,使用的方式很多,甚至可以赋予一个新值。
有一种情况就是定义在类方法中。类方法通常并不关心类对象,而是类的实例。例如,许多类方法集成了一个实例的 allocation 和 initialization ,通常同时设置实例变量的值。在这种方法中, 可能忍不住会发消息给新分配的实例并调用实例 self,
就像在实例方法中那样。但这样做是错误的。self 和 super 都both 指向接收的对象—该对象收到一条消息说让他执行这个方法。在一个实例方法内部, self 指向的是实例。但在类方法的内部,self 指向的是类对象。我们不能像下例这样做:
+ (Rectangle *)rectangleOfColor:(NSColor *) color |
{
|
self = [[Rectangle alloc] init]; // BAD |
[self setColor:color]; |
return self; |
} |
为了避免困惑,在类方法中,通常更好的做法是使用一个变量而不是 self 来指代一个实例:
+ (id)rectangleOfColor:(NSColor *)color |
{
|
id newInstance = [[Rectangle alloc] init]; // GOOD |
[newInstance setColor:color]; |
return newInstance; |
} |
事实上,与其发送 alloc 消息给类方法,不如发送alloc 给 self.
这种方式下,如果类是子类,并且 rectangleOfColor: 消息被子类接收到,这个实例返回的类型会与子类相同(例如, NSArray 的 array 方法被NSMutableArray所继承)。
+ (id)rectangleOfColor:(NSColor *)color |
{
|
id newInstance = [[self alloc] init]; // EXCELLENT |
[newInstance setColor:color]; |
return newInstance; |
} |
可以参考 “创建并初始化对象” 获取更多实现初始化相关的方法。
Much of object-oriented programming consists of writing the code for new objects—defining new classes. In Objective-C, classes are defined in two parts:
An interface that declares the methods and properties of the class and names its superclass
An implementation that actually defines the class (contains the code that implements its methods)
Each of these parts is typically in its own file. Sometimes, however, a class definition spans several files through the use of a feature called a category. Categories can compartmentalize a class definition or extend an existing one. Categories are described in “Categories and Extensions.”
Although the compiler doesn’t require it, class interface and implementation are usually in two different files. The interface file must be made available to anyone who uses the class.
A single file can declare or implement more than one class. Nevertheless, it’s customary to have a separate interface file for each class, if not also a separate implementation file. Keeping class interfaces separate better reflects their status as independent entities.
Interface and implementation files typically are named after the class. The name of the implementation file has
the.m extension,
indicating that it contains Objective-C source code. The interface file can be assigned any other extension. Because it’s included in other source files, the name of the interface file usually has the .h extension
typical of header files. For example, the Rectangle class would be declared in Rectangle.h and
defined inRectangle.m.
Separating an object’s interface from its implementation fits well with the design of object-oriented programs. An object is a self-contained entity that can be viewed from the outside almost as a black box. Once you’ve determined how an object interacts with other elements in your program—that is, once you’ve declared its interface—you can freely alter its implementation without affecting any other part of the application.
The declaration of a class interface begins with the compiler directive @interface and
ends with the directive@end.
(All Objective-C directives to the compiler begin with “@”.)
@interface ClassName : ItsSuperclass |
// Method and property declarations. |
@end |
The first line of the declaration presents the new class name and links it to its superclass. The superclass defines the position of the new class in the inheritance hierarchy, as discussed under “Inheritance.”
Methods and properties for the class are declared next, before the end of the class declaration. The names of methods that can be used by class objects, class methods, are preceded by a plus sign:
+ alloc; |
The methods that instances of a class can use, instance methods, are marked with a minus sign:
- (void)display; |
Although it’s not a common practice, you can define a class method and an instance method with the same name. A method can also have the same name as an instance variable, which is more common, especially if
the method returns the value in the variable. For example, Circle has a radius method that
could match a radius instance variable.
Method return types are declared using the standard C syntax for casting one type to another:
- (float)radius; |
Parameter types are declared in the same way:
- (void)setRadius:(float)aRadius; |
If a return or parameter type isn’t explicitly declared, it’s assumed to be the default type for methods and messages—an id.
The alloc method illustrated earlier returns id.
When there’s more than one parameter, the parameters are declared within the method name after the colons. Parameters break the name apart in the declaration, just as in a message. For example:
- (void)setWidth:(float)width height:(float)height; |
Methods that take a variable number of parameters declare them using a comma and ellipsis points, just as a function would:
- makeGroup:group, ...; |
Property declarations take the form:
@property (attributes) Type propertyName; |
Properties are discussed in more detail in “Declared Properties.”
Note: Historically, the interface required declarations of a class’s instance variables,
the data structures that are part of each instance of the class. These were declared in braces after the @interface declaration and before method declarations:
@interface ClassName : ItsSuperclass |
{
|
// Instance variable declarations. |
} |
// Method and property declarations. |
@end |
The interface file must be included in any source module that depends on the class interface—that includes
any module that creates an instance of the class, sends a message to invoke a method declared for the class, or mentions an instance variable declared in the class. The interface is usually included with the #import directive:
#import "Rectangle.h" |
This directive is identical to #include,
except that it makes sure that the same file is never included more than once. It’s therefore preferred and is used in place of #include in code examples throughout Objective-C–based
documentation.
To reflect the fact that a class definition builds on the definitions of inherited classes, an interface file begins by importing the interface for its superclass:
#import "ItsSuperclass.h" |
|
|
@interface ClassName : ItsSuperclass |
// Method and property declarations. |
@end |
This convention means that every interface file includes, indirectly, the interface files for all inherited classes. When a source module imports a class interface, it gets interfaces for the entire inheritance hierarchy that the class is built upon.
Note that if there is a precomp—a precompiled header—that supports the superclass, you may prefer to import the precomp instead.
An interface file declares a class and, by importing its superclass, implicitly contains declarations for all inherited classes, from NSObject on
down through its superclass. If the interface mentions classes not in this hierarchy, it must import them explicitly or declare them with the @class directive:
@class Rectangle, Circle; |
This directive simply informs the compiler that “Rectangle” and “Circle” are class names. It doesn’t import their interface files.
An interface file mentions class names when it statically types instance variables, return values, and parameters. For example, this declaration
- (void)setPrimaryColor:(NSColor *)aColor; |
mentions the NSColor class.
Because declarations like this simply use the class name as a type and don’t depend on any details of the class interface (its methods and instance variables), the @class directive
gives the compiler sufficient forewarning of what to expect. However, when the interface to a class is actually used (instances created, messages sent), the class interface must be imported. Typically, an interface file uses @class to
declare classes, and the corresponding implementation file imports their interfaces (since it needs to create instances of those classes or send them messages).
The @class directive minimizes the amount of code seen by the compiler and linker, and is therefore the simplest way to give
a forward declaration of a class name. Being simple, it avoids potential problems that may come with importing files that import still other files. For example, if one class declares a statically typed instance
variable of another class, and their two interface files import each other, neither class may compile correctly.
The purpose of the interface file is to declare the new class to other source modules (and to other programmers). It contains information they need to work with the class (programmers might also appreciate a little documentation).
The interface file tells users how the class is connected into the inheritance hierarchy and what other classes—inherited or simply referred to somewhere in the class—are needed.
Through its list of method declarations, the interface file lets other modules know what messages can be sent to the class object and instances of the class. Every method that can be used outside the class definition is declared in the interface file; methods that are internal to the class implementation can be omitted.
The definition of a class is structured very much like its declaration. It begins with an @implementation directive
and ends with the @end directive.
In addition, the class may declare instance variables in braces after the@implementation directive:
@implementation ClassName |
{
|
// Instance variable declarations. |
} |
// Method definitions. |
@end |
Instance variables are often specified by declared properties (see “Declared Properties”). If you don’t declare additional instance variables, you can omit the braces:
@implementation ClassName |
// Method definitions. |
@end |
Note: Every implementation file must import its own interface. For example, Rectangle.m importsRectangle.h.
Because the implementation doesn’t need to repeat any of the declarations it imports, it can safely omit the name of the superclass.
Methods for a class are defined, like C functions, within a pair of braces. Before the braces, they’re declared in the same manner as in the interface file, but without the semicolon. For example:
+ (id)alloc {
|
... |
} |
|
|
- (BOOL)isFilled {
|
... |
} |
|
|
- (void)setFilled:(BOOL)flag {
|
... |
} |
Methods that take a variable number of parameters handle them just as a function would:
#import <stdarg.h> |
|
|
... |
|
|
- getGroup:group, ... {
|
|
|
va_list ap; |
va_start(ap, group); |
... |
} |
By default, the definition of an instance method has all the instance variables of
the object within its scope. It can refer to them simply by name. Although the compiler creates the equivalent of C structures to store instance variables, the exact nature of the structure is hidden. You don’t need either of the structure operators (. or ->)
to refer to an object’s data. For example, this method definition refers to the receiver’s filled instance variable:
- (void)setFilled:(BOOL)flag |
{
|
filled = flag; |
... |
} |
Neither the receiving object nor its filled instance variable is declared as a parameter to this method, yet the instance variable
falls within its scope. This simplification of method syntax is a significant shorthand in the writing of Objective-C code.
When the instance variable belongs to an object that’s not the receiver, the object’s type must be made explicit to the compiler through static typing.
In referring to the instance variable of a statically typed object, the structure pointer operator (->) is used.
Suppose, for example, that the Sibling class declares a statically typed object, twin,
as an instance variable:
@interface Sibling : NSObject |
{
|
Sibling *twin; |
int gender; |
struct features *appearance; |
} |
As long as the instance variables of the statically typed object are within the scope of the class (as they are here because twin is
typed to the same class), a Sibling method can set them directly:
- makeIdenticalTwin |
{
|
if ( !twin ) {
|
twin = [[Sibling alloc] init]; |
twin->gender = gender; |
twin->appearance = appearance; |
} |
return twin; |
} |
To enforce the ability of an object to hide its data, the compiler limits the scope of instance variables—that is, limits their visibility within the program. But to provide flexibility, it also lets you explicitly set the scope at four levels. Each level is marked by a compiler directive:
Figure 2-1 illustrates the levels of scoping.
Figure 2-1 The scope of instance variables (@package scope not shown)
A scoping directive applies to all the instance variables listed after it, up to the next directive or the end of the list. In the following example, the age and evaluation instance
variables are private; name, job, and wage are
protected; and boss is public.
@interface Worker : NSObject |
{
|
char *name; |
@private |
int age; |
char *evaluation; |
@protected |
id job; |
float wage; |
@public |
id boss; |
} |
By default, all unmarked instance variables (like name above) are @protected.
All instance variables that a class declares, no matter how they’re marked, are within the scope of the class definition. For example, a class that declares a job instance
variable, such as the Worker class shown above, can refer to it in a method definition:
- promoteTo:newPosition |
{
|
id old = job; |
job = newPosition; |
return old; |
} |
Obviously, if a class couldn’t access its own instance variables, the instance variables would be of no use whatsoever.
Normally, a class also has access to the instance variables it inherits. The ability to refer to an instance
variable is usually inherited along with the variable. It makes sense for classes to have their entire data structures within their scope, especially if you think of a class definition as merely an elaboration of the classes it inherits from. ThepromoteTo: method
illustrated earlier could just as well have been defined in any class that inherits the jobinstance variable from the Worker class.
However, there are reasons why you might want to restrict inheriting classes from directly accessing an instance variable:
Once a subclass accesses an inherited instance variable, the class that declares the variable is tied to that part of its implementation. In later versions, it can’t eliminate the variable or alter the role it plays without inadvertently breaking the subclass.
Moreover, if a subclass accesses an inherited instance variable and alters its value, it may inadvertently introduce bugs in the class that declares the variable, especially if the variable is involved in class-internal dependencies.
To limit an instance variable’s scope to just the class that declares it, you must mark it @private. Instance variables marked @private are
only available to subclasses by calling public accessor methods, if they exist.
At the other extreme, marking a variable @public makes it generally available, even outside of class definitions that inherit
or declare the variable. Normally, to get information stored in an instance variable, other objects must send a message requesting it. However, a public instance variable can be accessed anywhere as if it were a field in a C structure. For example:
Worker *ceo = [[Worker alloc] init]; |
ceo->boss = nil; |
Note that the object must be statically typed.
Marking instance variables @public defeats the ability of an object to hide its data. It runs counter to a fundamental principle
of object-oriented programming—the encapsulation of data within objects where it’s protected from view and inadvertent error. Public instance variables should therefore be avoided except in extraordinary cases.
Objective-C provides two terms that can be used within a method definition to refer to the object that performs the method—self and super.
Suppose, for example, that you define a reposition method that needs to change the coordinates of whatever object it acts on.
It can invoke the setOrigin:: method to make the change. All it needs to do is send asetOrigin:: message
to the same object that the reposition message itself was sent to. When you’re writing the reposition code, you can refer to that object as either self or super.
The reposition method could read either:
- reposition |
{
|
... |
[self setOrigin:someX :someY]; |
... |
} |
or:
- reposition |
{
|
... |
[super setOrigin:someX :someY]; |
... |
} |
Here, self and super both refer to the object
receiving a reposition message, whatever object that may happen to be. The two terms are quite different, however. self is
one of the hidden parameters that the messaging routine passes to every method; it’s a local variable that can be used freely within a method implementation, just as the names of instance variables can be. super is
a term that substitutes for self only as the receiver in a message expression. As receivers, the two terms differ principally in how they affect the messaging process:
self searches
for the method implementation in the usual manner, starting in the dispatch table of the receiving object’s class. In the example above, it would begin with the class of the object receiving the reposition message.
super is
a flag that tells the compiler to search for the method implementation in a very different place. It begins in the superclass of the class that defines the method where super appears.
In the example above, it would begin with the superclass of the class where reposition is defined.
Wherever super receives a message, the compiler substitutes another messaging routine for the objc_msgSendfunction.
The substitute routine looks directly to the superclass of the defining class—that is, to the superclass of the class sending the message to super—rather than to the class
of the object receiving the message.
The difference between self and super becomes
clear when using a hierarchy of three classes. Suppose, for example, that we create an object belonging to a class called Low. The superclass of Low is Mid;
the superclass ofMid is High. All three classes define a method called negotiate,
which each class uses for its own purpose. In addition, Mid defines an ambitious method called makeLastingPeace,
which itself employs the negotiatemethod. The classes and those methods are illustrated in Figure
2-2.
Suppose that the implementation of makeLastingPeace (in the Mid class)
uses self to indicate the object to send the negotiate message to:
- makeLastingPeace |
{
|
[self negotiate]; |
... |
} |
When a message is sent to a Low object to perform the makeLastingPeace method, makeLastingPeace sends
anegotiate message to the same Low object. The messaging routine finds the version of negotiate defined
inLow, the class of self.
However, if the implementation of makeLastingPeace instead uses super as
the receiver,
- makeLastingPeace |
{
|
[super negotiate]; |
... |
} |
the messaging routine finds the version of negotiate defined in High.
It ignores the class (Low) of the object that received the makeLastingPeace message and
skips to the superclass of Mid, because Mid is wheremakeLastingPeace is
defined. Neither implementation finds the Mid version of negotiate.
As this example illustrates, super provides a way to bypass a method that overrides another method. Here, the use of super enabled makeLastingPeace to
bypass the Mid version of negotiate that redefined the Highversion
of that method.
Not being able to reach the Mid version of negotiate,
as just described, may seem like a flaw, but under the circumstances it’s intentional:
The author of the Low class intentionally overrode the Mid version
of negotiate so that instances of Low (and its subclasses) would invoke the redefined version
of the method instead. The designer of Low didn’t want Lowobjects to perform the inherited
method.
The author of the Mid method makeLastingPeace,
in sending the negotiate message to super (as shown in the second implementation), intentionally
skipped over the Mid version of negotiate (and over any versions that might be defined in
classes like Low that inherit from Mid) to perform the version defined in the Highclass.
The designer of the second implementation of makeLastingPeace wanted to use the High version
ofnegotiate and no other.
The Mid version of negotiate could still
be used, but it would take a direct message to a Mid instance to do so.
Messages to super allow
method implementations to be distributed over more than one class. You can override an existing method to modify or add to it and still incorporate the original method in the modification:
- negotiate |
{
|
... |
return [super negotiate]; |
} |
For some tasks, each class in the inheritance hierarchy can implement a method that does part of the job and passes the message on to super for
the rest. The init method, which initializes a newly allocated instance, is designed to work like this. Each init method
has responsibility for initializing the instance variables
defined in its class. But before doing so, it sends an init message to super to have the
classes it inherits from initialize their instance variables. Each version of init follows this procedure, so classes initialize their instance variables in the order of inheritance:
- (id)init |
{
|
self = [super init]; |
if (self) {
|
... |
} |
} |
It’s also possible to concentrate core functionality in one method defined in a superclass and have subclasses incorporate the method through messages to super.
For example, every class method that creates an instance must allocate storage for the new object and initialize its isa variable to the class structure. Allocation is typically
left to the alloc and allocWithZone: methods defined in the NSObject class.
If another class overrides these methods (a rare case), it can still get the basic functionality by sending a message to super.
super is simply a flag to the compiler telling it where to begin searching for the method to perform; it’s used only as the
receiver of a message. But self is a variable name that can be used in
any number of ways, even assigned a new value.
There’s a tendency to do just that in definitions of class methods. Class methods are often concerned not with the class object, but with instances of the class. For example, many class methods combine allocation
and initialization of an instance, often setting up instance variable values at the same time. In such a method, it might be tempting to send messages to the newly allocated instance and to call the instance self,
just as in an instance method. But that would be an error. self and super both refer to
the receiving object—the object that gets a message telling it to perform the method. Inside an instance method, self refers to the instance; but inside a class method, self refers
to the class object. This is an example of what not to do:
+ (Rectangle *)rectangleOfColor:(NSColor *) color |
{
|
self = [[Rectangle alloc] init]; // BAD |
[self setColor:color]; |
return self; |
} |
To avoid confusion, it’s usually better to use a variable other than self to refer to an instance inside a class method:
+ (id)rectangleOfColor:(NSColor *)color |
{
|
id newInstance = [[Rectangle alloc] init]; // GOOD |
[newInstance setColor:color]; |
return newInstance; |
} |
In fact, rather than sending the alloc message to the class in a class method, it’s often better to send alloc toself.
This way, if the class is subclassed, and the rectangleOfColor: message is received by a subclass, the instance returned is the same type as the subclass (for example, the array method
of NSArray is inherited byNSMutableArray).
+ (id)rectangleOfColor:(NSColor *)color |
{
|
id newInstance = [[self alloc] init]; // EXCELLENT |
[newInstance setColor:color]; |
return newInstance; |
} |
See “Creating and Initializing Objects” for more information about implementing initializer and related methods.
|
|
来自: 现在决定明天 > 《Objective-c官方文档》


