|
一直不明白为什么shiro能根据用户的密码和预设定的散列次数以及盐来生成密码和已有密码来匹配? 于是有了整个测试:
测试环境:springboot+shiro 账号0324(今天是3月24号) 密码也是0324 唯一不同的就是我在shiroConfiguration里面给密码散列次数的不同。 数据库存入的密码只散列了2次,而Debug走的时候我散列了三次 基于这个场景,有了这一篇文章。 我会把shiroConfiguration整个类放在最下面
new一个认证信息,这里是根据用户名从数据库查询到的结果: 参数:实体类,密码,盐,自定义realm类(注意:这里是从数据库拿到的信息,所以密码和盐都是暗码) 然后走下面的return语句,返回这个认证信息:  这句走完后直接进入源码:
public final AuthenticationInfo getAuthenticationInfo(AuthenticationToken token) /* */ throws AuthenticationException /* 565 */ AuthenticationInfo info = getCachedAuthenticationInfo(token); /* 566 */ if (info == null) /* 568 */ info = doGetAuthenticationInfo(token);一、 /* 569 */ log.debug("Looked up AuthenticationInfo [{}] from doGetAuthenticationInfo", info); /* 570 */ if ((token != null) && (info != null)) /* 571 */ cacheAuthenticationInfoIfPossible(token, info);二、 /* 574 */ log.debug("Using cached authentication info [{}] to perform credentials matching.", info); /* 577 */ if (info != null) /* 578 */ assertCredentialsMatch(token, info);三、这个是重点 /* 580 */ log.debug("No AuthenticationInfo found for submitted AuthenticationToken [{}]. Returning null.", token);
一、doGetAuthenticationInfo(token)方法这个token是用户输入的信息
token的信息:用户输入的: 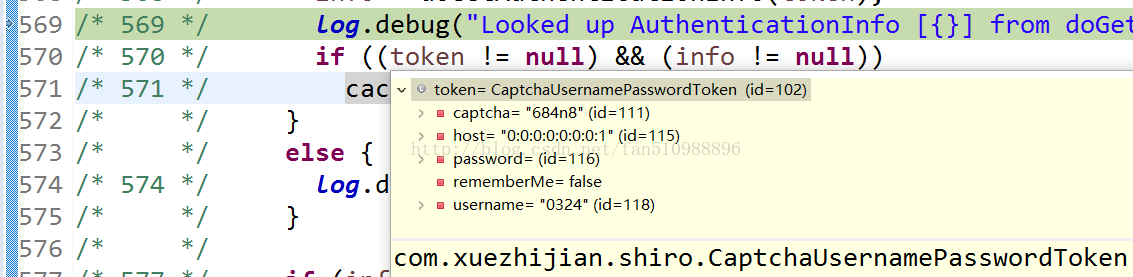
inof认证信息:从数据库查询到的: 
二、方法:cacheAuthenticationInfoIfPossible(token, info)方法:
/* */ private void cacheAuthenticationInfoIfPossible(AuthenticationToken token, AuthenticationInfo info) /* 506 */ if (!(isAuthenticationCachingEnabled(token, info))) { /* 507 */ log.debug("AuthenticationInfo caching is disabled for info [{}]. Submitted token: [{}].", info, token); /* 512 */ Cache cache = getAvailableAuthenticationCache(); /* 513 */ if (cache != null) { /* 514 */ Object key = getAuthenticationCacheKey(token); /* 515 */ cache.put(key, info); /* 516 */ log.trace("Cached AuthenticationInfo for continued authentication. key=[{}], value=[{}].", key, info); isAuthenticationCachingEnabled(token, info) /* */ protected boolean isAuthenticationCachingEnabled(AuthenticationToken token, AuthenticationInfo info) /* 536 */ return isAuthenticationCachingEnabled();
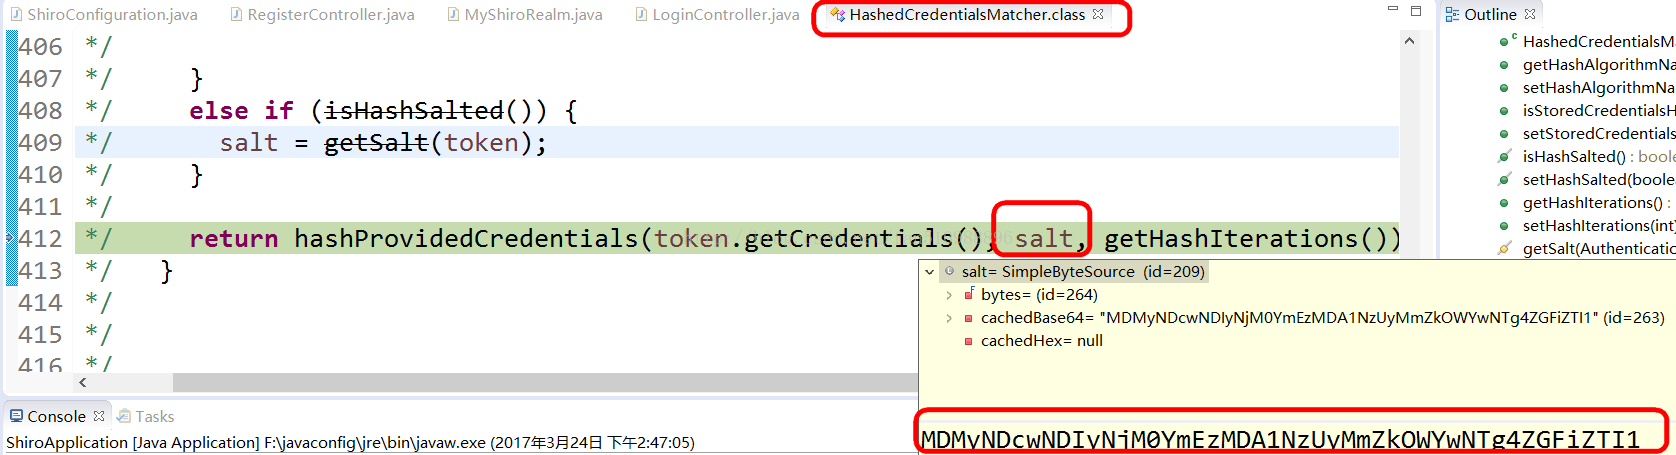
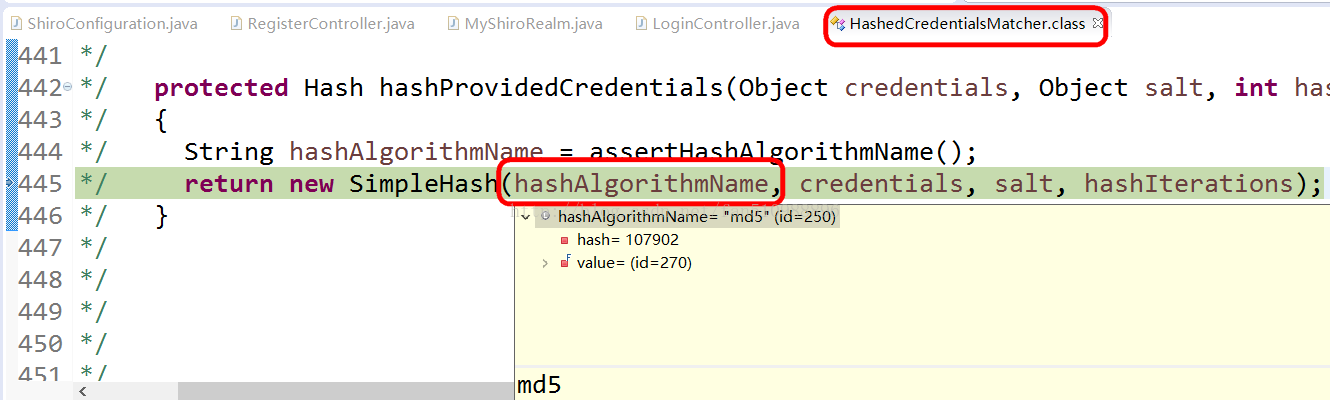
三、方法assertCredentialsMatch(token, info); 这里的token和info的信息都在上面截图: token是用户输入的信息 info是认证信息那里从数据库获取到的信息 /* */ protected void assertCredentialsMatch(AuthenticationToken token, AuthenticationInfo info) /* */ throws AuthenticationException /* 595 */ CredentialsMatcher cm = getCredentialsMatcher();一、 /* 596 */ if (cm != null) { /* 597 */ if (cm.doCredentialsMatch(token, info))二、这个方法更重要,正式比较开始了 /* 599 */ String msg = "Submitted credentials for token [" + token + "] did not match the expected credentials."; /* 600 */ throw new IncorrectCredentialsException(msg); /* 603 */ throw new AuthenticationException("A CredentialsMatcher must be configured in order to verify credentials during authentication. If you do not wish for credentials to be examined, you can configure an " + AllowAllCredentialsMatcher.class.getName() + " instance."); 一、CredentialsMatcher cm = getCredentialsMatcher(); /* */ public CredentialsMatcher getCredentialsMatcher() /* 194 */ return this.credentialsMatcher; 二、cm.doCredentialsMatch(token, info) ********** 二、看代码,这里的token和info还是咱们截图的信息 /* */ public boolean doCredentialsMatch(AuthenticationToken token, AuthenticationInfo info) /* 379 */ Object tokenHashedCredentials = hashProvidedCredentials(token, info);二A /* 380 */ Object accountCredentials = getCredentials(info); /* 381 */ return equals(tokenHashedCredentials, accountCredentials); 二AhashProvidedCredentials(token, info) /* */ protected Object hashProvidedCredentials(AuthenticationToken token, AuthenticationInfo info) /* 403 */ Object salt = null; /* 404 */ if (info instanceof SaltedAuthenticationInfo) { /* 405 */ salt = ((SaltedAuthenticationInfo)info).getCredentialsSalt();二AA /* 408 */ else if (isHashSalted()) { /* 409 */ salt = getSalt(token); /* 412 */ return hashProvidedCredentials(token.getCredentials(), salt, getHashIterations());二AB salt = ((SaltedAuthenticationInfo)info).getCredentialsSalt();二AA 这里你就会发现,为什么在info里面设置ByteSource了 /* */ public ByteSource getCredentialsSalt() /* 167 */ return this.credentialsSalt; hashProvidedCredentials(token.getCredentials(), salt, getHashIterations());二AB 这三个参数的截图我放下面,大家看,其实第一个是用户输入的密码,第二个是上面算出的盐,第三个是散列次数三, 这几个参数里面除了密码是用户输入的,其他俩个参数都是shiroconfigura里面配置的 /* */ protected Hash hashProvidedCredentials(Object credentials, Object salt, int hashIterations) /* 444 */ String hashAlgorithmName = assertHashAlgorithmName();获取加密算法,md5 参数分别是:算法名字:md5 用户输入的密码:0324 盐还是那个截图 散列次数:3 为了更直观一点,我又截图了,见下面 重点图1,重点图2,重点图3,重点图4 /* 445 */ return new SimpleHash(hashAlgorithmName, credentials, salt, hashIterations);见下面具体代码 /* */ public SimpleHash(String algorithmName, Object source, Object salt) /* */ throws CodecException, UnknownAlgorithmException /* 139 */ this(algorithmName, source, salt, 1); /* */ 这里是源码部分,但都是空格我就删除了,大家可以自己debug进去看 /* 167 */ if (!(StringUtils.hasText(algorithmName))) { /* 168 */ throw new NullPointerException("algorithmName argument cannot be null or empty."); /* 170 */ this.algorithmName = algorithmName; /* 171 */ this.iterations = Math.max(1, hashIterations); /* 172 */ ByteSource saltBytes = null; /* 173 */ if (salt != null) { /* 174 */ saltBytes = convertSaltToBytes(salt); /* 175 */ this.salt = saltBytes; /* 177 */ ByteSource sourceBytes = convertSourceToBytes(source); /* 178 */ hash(sourceBytes, saltBytes, hashIterations); 拿用户输入的密码与我们的配置文件的信息来匹配计算,来得到一个加密后的密码 这个时候让我们回到上面**********部分代码来看,大家搜索就可以找到,我为方便,把它们粘贴下来: 二、看代码,这里的token和info还是咱们截图的信息 /* */ public boolean doCredentialsMatch(AuthenticationToken token, AuthenticationInfo info) /* 379 */ Object tokenHashedCredentials = hashProvidedCredentials(token, info);二A /* 380 */ Object accountCredentials = getCredentials(info);二B /* 381 */ return equals(tokenHashedCredentials, accountCredentials);二C 我们进入二B来看:它其实就是将我们从数据库查到的暗码拿出来了! /* */ protected Object getCredentials(AuthenticationInfo info) /* 345 */ Object credentials = info.getCredentials(); /* 347 */ byte[] storedBytes = toBytes(credentials); /* 349 */ if ((credentials instanceof String) || (credentials instanceof char[])) /* 352 */ if (isStoredCredentialsHexEncoded()) /* 353 */ storedBytes = Hex.decode(storedBytes); /* 355 */ storedBytes = Base64.decode(storedBytes); /* 358 */ AbstractHash hash = newHashInstance(); /* 359 */ hash.setBytes(storedBytes); return equals(tokenHashedCredentials, accountCredentials);二C 真正比较开始了,上面我已经详细介绍了 tokenHashedCredentials是如何生成的。这里我们又获取到了数据库的密码,就开始比较了。 /* 595 */ CredentialsMatcher cm = getCredentialsMatcher(); /* 596 */ if (cm != null) { /* 597 */ if (cm.doCredentialsMatch(token, info)) /* 599 */ String msg = "Submitted credentials for token [" + token + "] did not match the expected credentials."; /* 600 */ throw new IncorrectCredentialsException(msg); 这个时候它就会把密码不正确的异常给出:整个过程我已经描述的很清楚了。
这个图片中,其实就是从shiroConfigure里面获取咱们配置的信息: 也就是: 加密方法是:md5 散列次数是:3   
我是盐jpg
我是散列次数jpg
重点图1,
重点图2,
重点图3,
重点图4,
密码1
密码2
下面整个就是整个ShiroConfiguration了 import org.apache.shiro.authc.credential.HashedCredentialsMatcher; import org.apache.shiro.cache.ehcache.EhCacheManager; import org.apache.shiro.mgt.SecurityManager; import org.apache.shiro.spring.security.interceptor.AuthorizationAttributeSourceAdvisor; import org.apache.shiro.spring.web.ShiroFilterFactoryBean; import org.apache.shiro.web.mgt.CookieRememberMeManager; import org.apache.shiro.web.mgt.DefaultWebSecurityManager; import org.apache.shiro.web.servlet.SimpleCookie; import org.springframework.context.annotation.Bean; import org.springframework.context.annotation.Configuration; import org.springframework.core.annotation.Order; import javax.servlet.Filter; import java.util.LinkedHashMap; public class ShiroConfiguration { * ShiroFilterFactoryBean 处理拦截资源文件问题。 * 注意:单独一个ShiroFilterFactoryBean配置是或报错的,以为在 * 初始化ShiroFilterFactoryBean的时候需要注入:SecurityManager Filter Chain定义说明 * 1、一个URL可以配置多个Filter,使用逗号分隔 2、当设置多个过滤器时,全部验证通过,才视为通过 * 3、部分过滤器可指定参数,如perms,roles public ShiroFilterFactoryBean shirFilter(SecurityManager securityManager) { ShiroFilterFactoryBean shiroFilterFactoryBean = new ShiroFilterFactoryBean(); shiroFilterFactoryBean.setSecurityManager(securityManager); Map<String, Filter> filtersMap = shiroFilterFactoryBean.getFilters(); KaptchaFilter kaptchaFilter = new KaptchaFilter(); filtersMap.put("kaptchaFilter", kaptchaFilter); //实现自己规则roles,这是为了实现or的效果 RoleFilter roleFilter = new RoleFilter(); filtersMap.put("roles", roleFilter); shiroFilterFactoryBean.setFilters(filtersMap); //rest:比如/admins/user/**=rest[user],根据请求的方法,相当于/admins/user/**=perms[user:method] ,其中method为post,get,delete等。 //port:比如/admins/user/**=port[8081],当请求的url的端口不是8081是跳转到schemal://serverName:8081?queryString,其中schmal是协议http或https等,serverName是你访问的host,8081是url配置里port的端口,queryString是你访问的url里的?后面的参数。 //perms:比如/admins/user/**=perms[user:add:*],perms参数可以写多个,多个时必须加上引号,并且参数之间用逗号分割,比如/admins/user/**=perms["user:add:*,user:modify:*"],当有多个参数时必须每个参数都通过才通过,想当于isPermitedAll()方法。 //roles:比如/admins/user/**=roles[admin],参数可以写多个,多个时必须加上引号,并且参数之间用逗号分割,当有多个参数时,比如/admins/user/**=roles["admin,guest"],每个参数通过才算通过,相当于hasAllRoles()方法。//要实现or的效果看http://zgzty.blog.163.com/blog/static/83831226201302983358670/ //anon:比如/admins/**=anon 没有参数,表示可以匿名使用。 //authc:比如/admins/user/**=authc表示需要认证才能使用,没有参数 //authcBasic:比如/admins/user/**=authcBasic没有参数表示httpBasic认证 //ssl:比如/admins/user/**=ssl没有参数,表示安全的url请求,协议为https //user:比如/admins/user/**=user没有参数表示必须存在用户,当登入操作时不做检查 Map<String, String> filterChainDefinitionMap = new LinkedHashMap<String, String>(); // 配置退出过滤器,其中的具体的退出代码Shiro已经替我们实现了 filterChainDefinitionMap.put("/logout", "logout"); filterChainDefinitionMap.put("/index", "user"); filterChainDefinitionMap.put("/", "user"); filterChainDefinitionMap.put("/login", "kaptchaFilter"); // <!-- 过滤链定义,从上向下顺序执行,一般将 /**放在最为下边 -->:这是一个坑呢,一不小心代码就不好使了; filterChainDefinitionMap.put("/operation", "roles[admin,aix]");//测试权限页面 //这段是配合 actuator框架使用的,配置相应的角色才能访问 // filterChainDefinitionMap.put("/health", "roles[aix]");//服务器健康状况页面 // filterChainDefinitionMap.put("/info", "roles[aix]");//服务器信息页面 // filterChainDefinitionMap.put("/env", "roles[aix]");//应用程序的环境变量 // filterChainDefinitionMap.put("/metrics", "roles[aix]"); // filterChainDefinitionMap.put("/configprops", "roles[aix]"); filterChainDefinitionMap.put("/favicon.ico", "anon");//网站图标 filterChainDefinitionMap.put("/AdminLTE-2.3.7/**", "anon");//配置static文件下资源能被访问的,这是个例子 filterChainDefinitionMap.put("/kaptcha.jpg", "anon");//图片验证码(kaptcha框架) filterChainDefinitionMap.put("/**", "authc"); // 如果不设置默认会自动寻找Web工程根目录下的"/login.jsp"页面 shiroFilterFactoryBean.setLoginUrl("/login"); shiroFilterFactoryBean.setSuccessUrl("/index"); shiroFilterFactoryBean.setUnauthorizedUrl("/errorView/403_error.html");//不生效(详情原因看MyExceptionResolver) shiroFilterFactoryBean.setUnauthorizedUrl("/404");//访问页面,而该角色没有该页面的权限 shiroFilterFactoryBean.setFilterChainDefinitionMap(filterChainDefinitionMap); return shiroFilterFactoryBean; public SecurityManager securityManager() { DefaultWebSecurityManager securityManager = new DefaultWebSecurityManager(); securityManager.setRealm(myShiroRealm()); //securityManager.setCacheManager(ehCacheManager());//这个如果执行多次,也是同样的一个对象; securityManager.setRememberMeManager(rememberMeManager()); * 身份认证realm; (这个需要自己写,账号密码校验;权限等) public MyShiroRealm myShiroRealm() { MyShiroRealm myShiroRealm = new MyShiroRealm(); myShiroRealm.setCredentialsMatcher(hashedCredentialsMatcher()); * 凭证匹配器 (由于我们的密码校验交给Shiro的SimpleAuthenticationInfo进行处理了 * 所以我们需要修改下doGetAuthenticationInfo中的代码; @return public HashedCredentialsMatcher hashedCredentialsMatcher() { HashedCredentialsMatcher hashedCredentialsMatcher = new HashedCredentialsMatcher(); hashedCredentialsMatcher.setHashAlgorithmName("md5");// 散列算法:这里使用MD5算法; // hashedCredentialsMatcher.setHashIterations(2);// 散列的次数,比如散列两次,相当于md5(md5("")); hashedCredentialsMatcher.setHashIterations(3);// 散列的次数,比如散列两次,相当于md5(md5("")); hashedCredentialsMatcher.setStoredCredentialsHexEncoded(true);//表示是否存储散列后的密码为16进制,需要和生成密码时的一样,默认是base64; return hashedCredentialsMatcher; * 开启shiro aop注解支持. 使用代理方式;所以需要开启代码支持; public AuthorizationAttributeSourceAdvisor authorizationAttributeSourceAdvisor(SecurityManager securityManager) { AuthorizationAttributeSourceAdvisor authorizationAttributeSourceAdvisor = new AuthorizationAttributeSourceAdvisor(); authorizationAttributeSourceAdvisor.setSecurityManager(securityManager); return authorizationAttributeSourceAdvisor; * 1、安全管理器:securityManager * 可见securityManager是整个shiro的核心; public EhCacheManager ehCacheManager(){ EhCacheManager cacheManager = new EhCacheManager(); cacheManager.setCacheManagerConfigFile("classpath:config/ehcache-shiro.xml"); public SimpleCookie rememberMeCookie(){ //System.out.println("ShiroConfiguration.rememberMeCookie()"); //这个参数是cookie的名称,对应前端的checkbox的name = rememberMe SimpleCookie simpleCookie = new SimpleCookie("rememberMe"); //<!-- 记住我cookie生效时间30天 ,单位秒;--> simpleCookie.setMaxAge(259200); public CookieRememberMeManager rememberMeManager(){ //System.out.println("ShiroConfiguration.rememberMeManager()"); CookieRememberMeManager cookieRememberMeManager = new CookieRememberMeManager(); cookieRememberMeManager.setCookie(rememberMeCookie()); return cookieRememberMeManager;
结论: 读源码真的能明白很多东西,或许你刚开始并不知道它是做什么的,甚至可能你连单词都看不懂! 但是你要明白书读百遍其义自见的含义,哈哈。 希望可以帮到大家! 都是自己手动写的,或许有不对的地方,希望大神指出。需要源码的可以联系我。
|