|
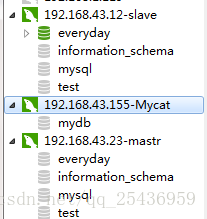
硬件:3台linux系统虚拟主机,Ip分别为192.168.43.23做主库(读写,192.168.43.12备库(读),192.168.43.155(安装mycat数据库中间件)
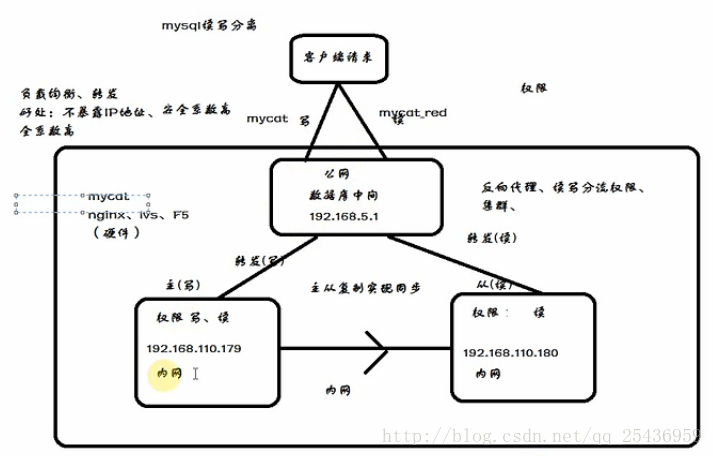
1.mycat读写分离架构图
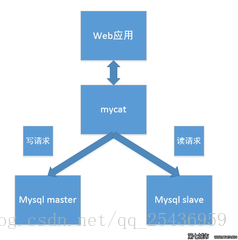
主要实现原理:
2. linux下使用yum安装mysql
(mastr192.168.43.23,slave192.168.43.12)
2.1安装mysql 服务器端:
yuminstall mysql-server
yuminstall mysql-devel
2.2编辑mastr192.168.43.23 mysql配置文件
vim /etc/my.conf 加入
default-character-set=utf8//设置字符集
server_id=23//服务id
log-bin=mysql-bin//开启日志
2.3编辑slave192.168.43.12配置文件
vim /etc/my.conf 加入
default-character-set=utf8
server_id=12
log-bin=mysql-bin
binlog_do_db=everyday//表示要同步的主机数据库实例是everyday
2.4创建root管理员
mysqladmin -u root password 123456
2.5登录
mysql -uroot -p输入密码即可。
3.开放远程连接权限(开放所有IP以root账号连接)
GRANT ALL PRIVILEGES ON *.* TO 'root'@'%' IDENTIFIED BY '123456' WITH GRANT OPTION;
4同步主从数据库
4.1主服务器给从服务器授权
登录mysql主服务器,执行sql:
grant replication slave on *.* to 'root'@'192.168.43.12'identified by '123456';FLUSH PRIVILEGES;
然后执行此语句SHOW MASTER STATUS:
4.2登录mysql从服务器,执行sql
STOP SLAVE;
change master tomaster_host='192.168.43.23',master_user='root',master_password='123456',
master_log_file='mysql-bin.000007',master_log_pos=2070;
START SLAVE;
然后执行该语句:SHOW SLAVE STATUS查询到结果yes,yes 说明同步成功
数据同步原理:通过同步2进制sql文件mysql-bin.000007进行同步,包含delete,insert,update等操作记录。
5.安装mycat数据库中间件
什么是mycat
一个彻底开源的,面向企业应用开发的大数据库集群
支持事务、ACID、可以替代MySQL的加强版数据库
一个可以视为MySQL集群的企业级数据库,用来替代昂贵的Oracle集群
一个融合内存缓存技术、NoSQL技术、HDFS大数据的新型SQLServer
结合传统数据库和新型分布式数据仓库的新一代企业级数据库产品
一个新颖的数据库中间件产品
5.1.安装mycat(192.168.43.155)
解压 tar zxvfMycat-server-1.6-RELEASE-20161028204710-linux.tar.gz -C /usr/local/
移动到/usr/local目录 mv mycat/usr/local
cd /usr/local/mycat/bin
./mycatstart启动
./mycat stop 停止
5.2配置mycat实现读写分离
# vim /usr/local/mycat/conf/server.xml //新增2个账号用来登录mycat,添加以下内容
<username="mycatread"> //mycat用户名 <propertyname="password">mycat</property> //mycat密码 <propertyname="schemas">mydb</property> //mycat虚拟数据库名 <propertyname="readOnly">true</property> //只读 <propertyname="password">mycat</property> <propertyname="schemas">mydb</property>
在这里要注意,默认的虚拟数据名是TESTDB,如果schema.xml里面没有配置testdb,那就要把testdb改成schema.xml里面有的虚拟数据名。这里定义的用户名和密码,虚拟数据库名,并不是在mysql中真实存在的。
:wq
保存退出
vim schema.xml
配置schema.xml
<!DOCTYPE mycat:schema SYSTEM "schema.dtd"> <mycat:schema xmlns:mycat="http://cat/"> <schema name="mydb" checkSQLschema="false" sqlMaxLimit="100" dataNode="my1" />//定义虚拟数据库名mydb <dataNode name="my1" dataHost="test1" database="everyday" /> //真实数据库名test <dataHost name="test1" maxCon="1000" minCon="10" balance="1" writeType="0" dbType="mysql" dbDriver="native" > <heartbeat>select user()</heartbeat> <writeHost host="hostM1" url="192.168.43.23:3306" user="root" password="123456" > //真实数据库的连接方式 <readHost host="hostS1" url="192.168.43.12:3306" user="root" password="123456" /> //同上
mycat的配置参数,相当的多。重点说一下 balance="1"与writeType="0"
a.balance
属性负载均衡类型,目前的取值有 4 种:
1.balance="0",不开启读写分离机制,所有读操作都发送到当前可用的 writeHost上。
2.balance="1",全部的 readHost与 stand by writeHost 参与 select 语句的负载均衡,简单的说,当双主双从模式(M1 ->S1 , M2->S2,并且 M1 与M2 互为主备),正常情况下, M2,S1,S2 都参与 select 语句的负载均衡。
3.balance="2",所有读操作都随机的在 writeHost、 readhost 上分发。
4.balance="3", 所有读请求随机的分发到 wiriterHost对应的 readhost 执行,writerHost 不负担读压力,注意 balance=3 只在 1.4 及其以后版本有, 1.3 没有。
b.writeType属性
负载均衡类型,目前的取值有 3种:
1.writeType="0",所有写操作发送到配置的第一个 writeHost,第一个挂了切到还生存的第二个
writeHost,重新启动后已切换后的为准,切换记录在配置文件中:dnindex.properties.
2.writeType="1",所有写操作都随机的发送到配置的 writeHost。
3. writeType="2",没实现。
# netstat -tpnl |grep 8066 tcp 0 0 :::8066 :::* LISTEN 31728/java Mycat-server is running (31726).
6 配置完成之后添加数据测试
登录windows系统中的mysql客户端进行连接
mycat连接方式如下:

mycat中间件做读写分离完成
7springboot通过application.yml文件配置mycat连接池
项目目录

项目依赖pom.xml
<project xmlns="http://maven./POM/4.0.0" xmlns:xsi="http://www./2001/XMLSchema-instance" xsi:schemaLocation="http://maven./POM/4.0.0 http://maven./xsd/maven-4.0.0.xsd"> <modelVersion>4.0.0</modelVersion> <groupId>com.sunyard</groupId> <artifactId>spboot</artifactId> <version>0.0.1-SNAPSHOT</version> <!--必须要引入继承 spring-boot-starter-parent 帮我们实现很多jar的依赖,不需要写jar版本 --> <groupId>org.springframework.boot</groupId> <artifactId>spring-boot-starter-parent</artifactId> <version>1.5.3.RELEASE</version> <!-- springmvc springboot默认集成,添加springboot-web依赖即可 --> <groupId>org.springframework.boot</groupId> <artifactId>spring-boot-starter-web</artifactId> <groupId>org.springframework.boot</groupId> <artifactId>spring-boot-starter-freemarker</artifactId> <artifactId>mysql-connector-java</artifactId> <!-- springboo与mybatis整合包 --> <groupId>org.mybatis.spring.boot</groupId> <artifactId>mybatis-spring-boot-starter</artifactId> <groupId>org.springframework.boot</groupId> <artifactId>spring-boot-starter-jdbc</artifactId> <!-- yml支持 @ConfigurationProperties 注解 --> <groupId>org.springframework.boot</groupId> <artifactId>spring-boot-configuration-processor</artifactId>
application.yml
url: jdbc:mysql://192.168.43.155:8066/mydb driverClassName: com.mysql.jdbc.Driver
controller
package com.spboot.controller; import org.springframework.beans.factory.annotation.Autowired; import org.springframework.stereotype.Controller; import org.springframework.ui.ModelMap; import org.springframework.web.bind.annotation.RequestMapping; import org.springframework.web.servlet.ModelAndView; import com.spboot.pojo.Ticket; import com.spboot.service.TicketService; public class TicketController { private TicketService ticketService; @RequestMapping("/getTicketList.do") public ModelAndView getTicketList() { List<Ticket> ticketList = ticketService.getTicketList(); ModelAndView mav = new ModelAndView(); mav.setViewName("index"); mav.addObject("ticketList", ticketList); @RequestMapping("/getFtl.do") public ModelAndView getFtl(ModelAndView mav) { mav.addObject("name", "ss"); mav.setViewName("index"); @RequestMapping("/index") public String getFtlt(ModelMap map) { map.addAttribute("name", "你妈");
service
package com.spboot.service; import org.springframework.beans.factory.annotation.Autowired; import org.springframework.stereotype.Service; import com.spboot.mapper.TicketMapper; import com.spboot.pojo.Ticket; import com.spboot.utils.common.TimeUtils; public class TicketService { private TicketMapper ticketMapper; public List<Ticket> getTicketList() { List<Ticket> ticketList = ticketMapper.getTicketList(); for (Ticket ticket : ticketList) { String beginTimeStr = TimeUtils.getISOTime(ticket.getBeginTime()); String endTimeStr = TimeUtils.getISOTime(ticket.getEndTime()); ticket.setBeginTimeStr(beginTimeStr); ticket.setEndTimeStr(endTimeStr);
mapper
package com.spboot.mapper; import org.apache.ibatis.annotations.Select; import com.spboot.pojo.Ticket; public interface TicketMapper { @Select("select * from ticket;") List<Ticket> getTicketList();
ticket
* @date 2018年1月14日 下午7:29:17 private Integer ticketID; private String startting; private String destination; private String beginTimeStr; private String endTimeStr; public Integer getTicketID() { public void setTicketID(Integer ticketID) { this.ticketID = ticketID; public String getStartting() { public void setStartting(String startting) { this.startting = startting; public String getDestination() { public void setDestination(String destination) { this.destination = destination; public Integer getPrice() { public void setPrice(Integer price) { public Date getBeginTime() { public void setBeginTime(Date beginTime) { this.beginTime = beginTime; public Date getEndTime() { public void setEndTime(Date endTime) { public String getBeginTimeStr() { public void setBeginTimeStr(String beginTimeStr) { this.beginTimeStr = beginTimeStr; public String getEndTimeStr() { public void setEndTimeStr(String endTimeStr) { this.endTimeStr = endTimeStr;
index.ftl(模板引擎)
<title>Insert title here</title> <table class="table" border="2"> <#list ticketList as ticket> <td>${ticket.ticketID}</td> <td>${ticket.startting}</td> <td>${ticket.destination}</td> <td>${ticket.beginTimeStr}</td> <td>${ticket.endTimeStr}</td>
全局捕获异常
package com.spboot.spexception; import java.util.HashMap; import javax.servlet.http.HttpServletRequest; import javax.servlet.http.HttpServletResponse; import org.springframework.core.annotation.AnnotationUtils; import org.springframework.web.bind.annotation.ControllerAdvice; import org.springframework.web.bind.annotation.ExceptionHandler; import org.springframework.web.bind.annotation.ResponseBody; import org.springframework.web.bind.annotation.ResponseStatus; * @ClassName: GlobalExceptionHandler * @Description: springboot全局异常捕获 public class GlobalExceptionHandler { @ExceptionHandler(Exception.class) public Map<String, Object> exceptionHandler(HttpServletRequest request,HttpServletResponse response,Exception e){ if (AnnotationUtils.findAnnotation(e.getClass(), ResponseStatus.class)!=null) { Map<String, Object> resMap=new HashMap<>(); resMap.put("url", request.getRequestURL()); resMap.put("class",e.getClass()); resMap.put("cause",e.getCause()); resMap.put("message",e.getMessage());
application.java
import org.mybatis.spring.annotation.MapperScan; import org.springframework.boot.SpringApplication; import org.springframework.boot.autoconfigure.EnableAutoConfiguration; import org.springframework.context.annotation.ComponentScan; * @ClassName: application * @date 2018年1月26日 下午4:27:25 @ComponentScan(basePackages="com.spboot.*") @MapperScan(basePackages="com.spboot.*") public class Application { public static void main(String[] args) { SpringApplication.run(Application.class, args);
点击右键启动项目,控制台打印如下日志

访问接口
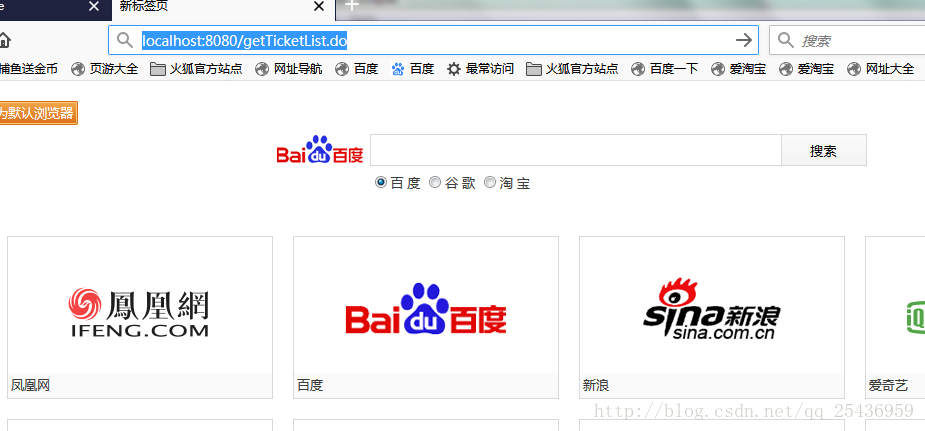
结果页面
|