1.首先去http://www./nsnam/ns/ns-build.html下载ns-allinone-2.35.tar.gz 2.
拷贝到用户目录下 如 /home/mingyong/
3. 更新一下系统 sudo apt-get update #更新源列表
sudo apt-get upgrade #更新已安装的包
4. 安装几个依赖文件 sudo apt-get install build-essential sudo apt-get install tcl8.5 tcl8.5-dev tk8.5 tk8.5-dev
sudo apt-get install libxmu-dev libxmu-headers
5. 解压 tar -xvzf ns-allinone-2.35.tar.gz
mv ns-allinone-2.35 ns #将文件夹ns-allinone-2.35改为ns,方便以后操作
6. 安装 cd ns
sudo ./install
补充 :安装包好像有一点问题,导致安装失败 In file included from linkstate/ls.cc:67:0:
linkstate/ls.h: In instantiation of ‘void LsMap::eraseAll() [with Key = int; T = LsIdSeq]’:
linkstate/ls.cc:396:28: required from here
linkstate/ls.h:137:20: error: ‘erase’ was not declared in this scope, and no declarations were found by argument-dependent lookup at the point of instantiation [-fpermissive]
linkstate/ls.h:137:20: note: declarations in dependent base ‘std::map, std::allocator > >’ are not found by unqualified lookup
linkstate/ls.h:137:20: note: use ‘this->erase’ instead
make: *** [linkstate/ls.o] Error 1
Ns make failed!
解决方法:
将 ns/ns-2.35/linkstate/ls.h中的137行void eraseAll() { erase(baseMap::begin(), baseMap::end()); }改为 void eraseAll() { this->erase(baseMap::begin(), baseMap::end()); }
然后重新执行 sudo ./install
几分钟后出现下图,表明安装好了
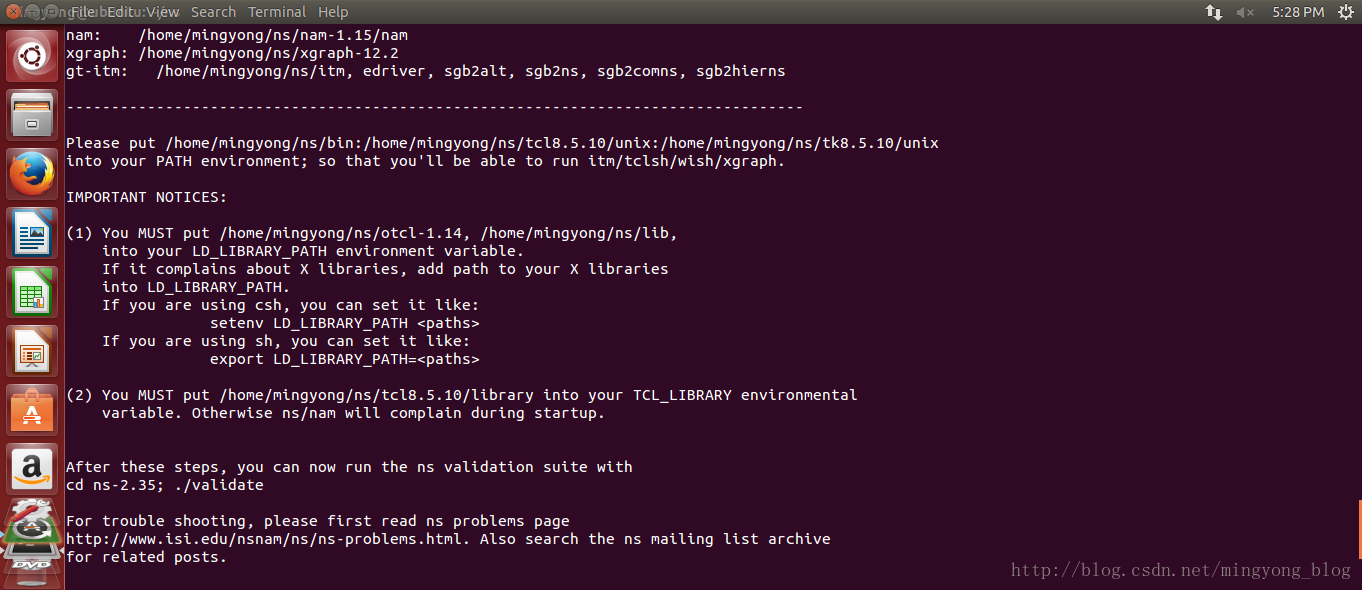
7. 设置环境变量 sudo gedit ./bashrc
在文件尾加入: export PATH="$PATH:/home/mingyong/ns/bin:/home/mingyong/ns/tcl8.5.10/unix:/home/mingyong/ns/tk8.5.10/unix"
export LD_LIBRARY_PATH="$LD_LIBRARY_PATH:/home/mingyong/ns/otcl-1.14:/home/mingyong/ns/lib"
export TCL_LIBRARY="$TCL_LIBRARY:/home/mingyong/ns/tcl8.5.10/library"
8 新开启一个终端,输入ns,出现如下图表面安装成功,也可以进入 ns/ns-2.35, 输入./validate进行验证

出现问题汇总:
1. NS2下载
在OpenSource中search NS2.30
我下载的版本是NS2.30, 下载的文件为ns-allinone-2.30.tar.gz。 下载完后将它解压缩到主文件夹下(我的是 /home/nuaa/Soft/): tar xvfz ns-allinone-2.30.tar.gz 2. 需要用到的软件包 build-essential
tcl8.4 tcl8.4-dev tk8.4 tk8.4-dev libxmu-dev 3. 安装
cd/home/nsusr/ns-allinone-2.30 sudo ./install
*注意当出现类似tk8.4.18,安装中断退出时,先输入:sudo apt-cache search x11-dev 得到类似以下信息:
libgl1-mesa-swx11-dev - A free implementation of the OpenGL API -- development files libx11-dev - X11 client-side library (development headers) libghc6-x11-dev - Haskell X11 binding for GHC
libgtkglextmm-x11-dev - C++ wrapper for the OpenGL Extension to GTK (development files) 分别安装上面的组件(更新为最新版本,当然如果已经是最新版本的话,它会提醒),命令如下:
sudo apt-get install libx11-dev
sudo apt-get install libgl1-mesa-swx11-dev sudo apt-get install libghc6-x11-dev
sudo apt-get install libgtkglextmm-x11-dev
4. 出错处理
1) 刚开始安装时显示gcc can't create executables之类的提示 解决方案:
这是由于我用的是Ubuntu免费邮寄的安装盘,安装后的系统中gcc是不能用来的开发的,只有一个空壳,所以需要重新安装gcc。 先用命令: sudo apt-get remove gcc
然后sudo apt -get install build-essential 便成功解决问题。
2) 再次安装NS2时发现安装至tk8.4.13时出现错误,安装中断退出。在安装日志上发现一句:x11/xlib.h nosuch file or directory 在网上查阅了资料,原来是x11M没有装。 解决方案:
先安装X11,命令为 sudo apt-get install libx11-dev 注意:apt-get之间没有空格 结果仍然出错如下:
checking for main in -lXbsd... no
checking for socket in -lsocket... no
checking for gethostbyname in -lnsl... yes checking for dcgettext in -lintl... no
checking for getnodebyname in -ldnet_stub... no checking that g++ can handle -O2... no checking standard STL is available... no checking for tcl.h... -I../include checking for tclInt.h... -I../include checking for libtcl8.4... -L../lib
-ltcl8.4 checking for init.tcl... ../lib/tcl8.4
checking for http.tcl... ../lib/tcl8.4/http1.0 checking Tcl http.tcl library... yes checking for tclsh8.4.11... no
checking for tclsh8.4... ../bin/tclsh8.4 checking for tk.h... -I../include
checking for libtk8.4... -L../lib -ltk8.4 checking for tk.tcl... ../lib/tk8.4 checking for X11 header files can't find X includes
otcl-1.12 configuration failed! Exiting ...
Please check http://www./nsnam/ns/ns-problems.html for common problems and bug fixes.
还是没有得到解决.分析了一下可能是x11没有安装完整,于是先输入:sudo apt-cache search x11-dev
得到以下信息:
libx11-dev - X11 client-side library (development headers)
xlibs-dev - X Window System client library development files transitional package libghc6-x11-dev - Haskell X11 binding for GHC
libooc-x11-dev - X11 specific modules for the oo2c compiler (devel)
libg l1-mesa-swx11-dev - A free implementation of the OpenGL API -- development support files
分别安装上面的组件,命令如下: sudo apt-get install libx11-dev sudo apt-get install xlibs-dev
sudo apt-get install libghc6-x11-dev sudo apt-get install libooc-x11-dev 然后继续安装,等了半天,安装完成!
3) 问题三:can't find X includes checking for X11 header files can't find X includes
otcl-1.13 configuration failed! Exiting ...
Please check http://www./nsnam/ns/ns-problems.html for common problems and bug fixes
无奈,只得在网上搜索答案,有人说X11路径不对,目录"/usr/include"下找到了X11,真以为路径不对,
按照其提供的解决方法,进入有configure的文件先运行./configure --x-includes=/usr/include/X11,重新.
/install,问题仍旧存在,然后看到一个帖子,说出现的问题主要是找不到/usr/include/X11/Intrinsic.h文件, 到/usr/include/X11下一搜索,果然没有此文件,想必有一些东西没装完整,尝试:sudo apt-get install libXt-dev此步骤做完后,重新./install,这下终于ok了!
4) 问题四:make: *** [tk3d.o] Error 1 tk8.4.18 make failed! Exiting ..
原因: The required packages are :
libx11-dev , libxmu-dev , libxmu-headers , libxt-dev , libtool
解决方法: 安装:libx11-dev , libxmu-dev , libxmu-headers , libxt-dev , libtool
5) 问题五:make: *** [libotcl.so] 错误 1 otcl-1.13 make failed! Exiting ..
原因: gcc 4.0版本以前是用"ld -share"来生成共享库的,但是到了4.0以上的版本(我的 为gcc version 4.4.1),这个命令改为"gcc -share"即可 解决方法: 把ns-allinone-2.33/otcl-1.13文件夹下的configure.in及configure中的"ld -shar ed"替换成"gcc -shared",并保存。回到ns-allinone-2.33/目录重新运行"./install"
6) 问题六:错误提示:make: g++:命令未找到 make: *** [tcl2c++] 错误 127 tclcl-1.19 make failed! Exiting ... 在终端输入命令 g++,看提示信息,如下 yhf@yhf-desktop:~$ g++
若显示:程序 'g++' 已包含在以下软件包中: * g++
* pentium-builder
试试:sudo apt-get install <选定的软件包> bash: g++:找不到命令 yhf@yhf-desktop:~$ 说明,没装g++…… 若显示 g++: 没有输入文件
说明,您装了……(我还没遇到这个问题)
那就装一个吧,命令是 sudo apt-get install g ++ 选择 y ,ok,等会儿吧……
我的g++装过,只是制作交叉编译链的时候,换了个低版本的……
7). 问题七[libotcl.so] 错误 1cd ns-2.30 ld -shared -olibotcl.so otcl.o otcl.o: Infunction `OTclDispatch':
/home/yanna/ns-allinone-2.30/otcl-1.12/otcl.c:495:undefined reference to
`__stack_chk_fail_local' otcl.o: Infunction `Otcl_Init':
/home/yanna/ns-allinone-2.30/otcl-1.12/otcl.c:2284:undefined reference to `__stack_chk_fail_local'
ld: libotcl.so:hidden symbol `__stack_chk_fail_local' isn't defined ld: final linkfailed: Nonrepresentable section on output make: ***[libotcl.so] 错误 1cd ns-2.30;./validate otcl-1.12 makefailed! Exiting ...
Seehttp://www./nsnam/ns/ns-problems.html for problems
在官网上有解决方案,应该是个BUG,会在以后版本中解决: otcl.o: In function `OTclDispatch':
/home/ns/ns-allinone-2.30/otcl/otcl.c:495:undefined reference to `__stack_chk_fail_local' otcl.o: In function `Otcl_Init':
/home/ns/ns-allinone-2.30/otcl/otcl.c:2284:undefined reference to `__stack_chk_fail_local' ld: libotcl.so: hidden symbol `__stack_chk_fail_local'isn't defined ld: final link failed: Nonrepresentablesection on output make: *** [libotcl.so] Error 1
This error is because the linker being usedis "ld -shared" instead of "gcc -shared". If you edit one line in otcl-1.12/configure,and rerun install , it should work:
修改 /home/nuaa/Soft/ns2/ns-allinone-2.30/otcl-1.12/configure 文件
;;
Linux*)
SHLIB_CFLAGS="-fpic"
SHLIB_LD="ld-shared" → SHLIB_LD="gcc-shared" SHLIB_SUFFIX=".so" DL_LIBS="-ldl" SHLD_FLAGS=""
This will be fixed in future revisions ofns-2. 改完后重新安装。
8). 问题八[Tcl.o] 错误 1
Tcl.cc:In member function ‘void Tcl::eval(char*)’:
Tcl.cc:182: warning: deprecated conversion from string constant to ‘char*’ Tcl.cc: In member function ‘int TclObject::traceVar(const char*, TclObject*)’: Tcl.cc:421: warning: deprecated conversion from string constant to ‘char*’
Tcl.cc: In static member function ‘static int TclClass::create_shadow(void*,Tcl_Interp*, int, const char**)’:
Tcl.cc:509: warning: deprecated conversion from string constant to ‘char*’ Tcl.cc:511: warning: deprecated conversion from string constant to ‘char*’
Tcl.cc: In static member function ‘static int TclClass::dispatch_instvar(void*,Tcl_Interp*, int, const char**)’:
Tcl.cc:566: error: invalid conversion from ‘const char*’ to ‘char*’
Tcl.cc:571: warning: deprecated conversion from string constant to ‘char*’ Tcl.cc: In member function ‘virtual void TclClass::bind()’:
Tcl.cc:603: warning: deprecated conversion from string constant to ‘char*’ Tcl.cc:605: warning: deprecated conversion from string constant to ‘char*’ make: *** [Tcl.o] 错误 1
tclcl-1.18 make failed! Exiting ...
由于gcc版本过高引起的编译问题 gcc-4.4 --> gcc-4.3 1. sudo apt-get install gcc-4.3
安装了之后,系统之中就存在两个GCC版本4.4和4.3,可以通过ls命令查看: 1. ls /usr/bin/gcc*
2. /usr/bin/gcc /usr/bin/gcc-4.3 /usr/bin/gcc-4.4 /usr/bin/gccbug-4.3 但是这时系统默认的GCC还是4.4版的,可以通过gcc -v查看版本号 设置GCC4.3和GCC4.4的可选项,在终端输入以下命令
1. sudo update-alternatives --install/usr/bin/gcc gcc /usr/bin/gcc-4.4 40 2. sudo update-alternatives --install /usr/bin/gccgcc /usr/bin/gcc-4.3 30 现在设置GCC的默认版本,输入下面命令: sudoupdate-alternatives --config gcc
我得到的结果:
There are 2choices for the alternative gcc (providing /usr/bin/gcc). Selection Path Priority Status
------------------------------------------------------------ * 0 /usr/bin/gcc-4.4 40 auto mode 1 /usr/bin/gcc-4.3 30 manual mode 2 /usr/bin/gcc-4.4 40 manual mode
然后输入“1”,再查看一下gcc的版本,已经变成4.3的了~~~~
同样对于g++也可以使用同样的方法从4.4高版本切换到4.3低版本。。。
9) 问题九:安装成功后运行样例程序发现ns模拟没有问题就是不能自动调用nam! 显示错误为:
ns: finish: couldn't execute "nam": no such file or directory while executing
"exec nam out.nam &"
(procedure "finish" line 7) invoked from within "finish"
解决方案:
先手动编译nam生成可执行文件nam
进入NS_HOME/nam-1.12(NS_HOME为安装ns2的路径)输入命令:make 结果显示错误:
xwd.c:87:29: 错误: X11/Xmu/WinUtil.h:No such file or directory make: *** [xwd.o] 错误 1
问题是xmu没有安装,于是只好再装xmu, 命令为:
sudo apt-get install libxmu-dev
然后在输入make进行编译,完成后在NS_HOME/nam-1.12/中可以发现可执行文件nam将其复制到 NS_
HOME/bin/目录下,这样由于$PATH环境变量中有NS_HOME/bin项,nam就可以直接运行了。
至此,终于大功告成了!!!
10) 问题十:安装成功NS2后,可以运行ns命令,但是却不能运行nam图形界面,输入 >nam
提示出现下列错误
[code omitted because of length] : no event type or button # or keysym while executing
"bind Listbox <MouseWheel> {
%W yview scroll [expr {- (%D / 120) * 4}] units }"
invoked from within
"if {[tk windowingsystem] eq "classic" || [tk windowingsystem] eq "aqua"} { bind Listbox <MouseWheel> {
%W yview scroll [expr {- (%D)}] units }
bind Li..."
由于nam调用的tk组件和xproto-7.0.13不兼容导致的(xproto-7.0.13 新添加了 GenericEvent) 可以到这里下载补丁http://bugs./show_bug.cgi?id=225999
作者的意思就是在 /ns-allinone-2.33/tk8.4.18/tk-8.4.14/generic/tkBind.c 的第588行添加: #ifdef GenericEvent
/* GenericEvent */ 0, #endif
保存退出后,$cd ns-2.33 $./install
重新安装ns-allinone2.33就可以了.
最后,需要将ns-2.33中的“ns”和nam-1.12中的“nam”拷贝到/usr/local/bin下面。 这样就能正常调用ns和nam了
5. 配置环境变量
安装完成后会看到修改环境变量的提示: Please put
/home/nuaa/Soft/ns2/ns-allinone-2.30/bin,/home/nuaa/Soft/ns2/ns-allinone-2.30/tcl8.4.13/unix,home/nuaa/Soft/ns2/ns-allinone-2.30/tcl8.4.13/unix"
into your PATH environment; so that you'llbe able to run itm/tclsh/wish/xgraph. IMPORTANT NOTICES: (1) You MUST put
/home/nuaa/Soft/ns2/ns-allinone-2.30/tcl8.4.13/otcl-1.12,/home/nuaa/Soft/ns2/ns-allinone-2.30/tcl8.4.13/lib
into your LD_LIBRARY_PATH environment variable.
Ifit complains about X libraries, add path to your X libraries into LD_LIBRARY_PATH.
If you are using csh, you can set it like: setenv LD_LIBRARY_PATH <paths> If you are using sh, you can set it like: export LD_LIBRARY_PATH=<paths>
(2) You MUST put /home/nuaa/Soft/ns2/ns-allinone-2.30/tcl8.4.13/libraryinto your TCL_LIBRARY environmental
variable. Otherwise ns/nam will complain during startup. After these steps, you can now run the nsvalidation suite with cd ns-2.30; ./validate
For trouble shooting, please first read nsproblems page
http://www./nsnam/ns/ns-problems.html.Also search the ns mailing list archive for related posts .
回到主文件夹,修改bash配置文件.bashrc: sudo gedit .bashrc 在文件最后加上:
PATH="$PATH:/home/nuaa/Soft/ns2/ns-allinone-2.30/bin:/home/nuaa/Soft/ns2/ns-allinone-2.30/tcl8.4.13/unix:/home/nuaa/Soft/ns2/ns-allinone-2.30/tcl8.4.13/unix"
LD_LIBRARY_PATH="/home/nuaa/Soft/ns2/ns-allinone-2.30/tcl8.4.13/otcl-1.12:/home/nuaa/Soft/ns2/ns-allinone-2.30/tcl8.4.13/lib"
TCL_LIBRARY="$TCL_LIBRARY:/home/nuaa/Soft/ns2/ns-allinone-2.30/tcl8.4.13/library" 6. 安装验证
安装结束后的提示中也告诉我们如何验证是否正确安装: cdns-2.30 ./validate
另外,也可以打开一个新终端进行试运行:
输入ns,如果显示一个%则说明已正确安装。如果提示“command not found”则重新启动试试。
|


