|
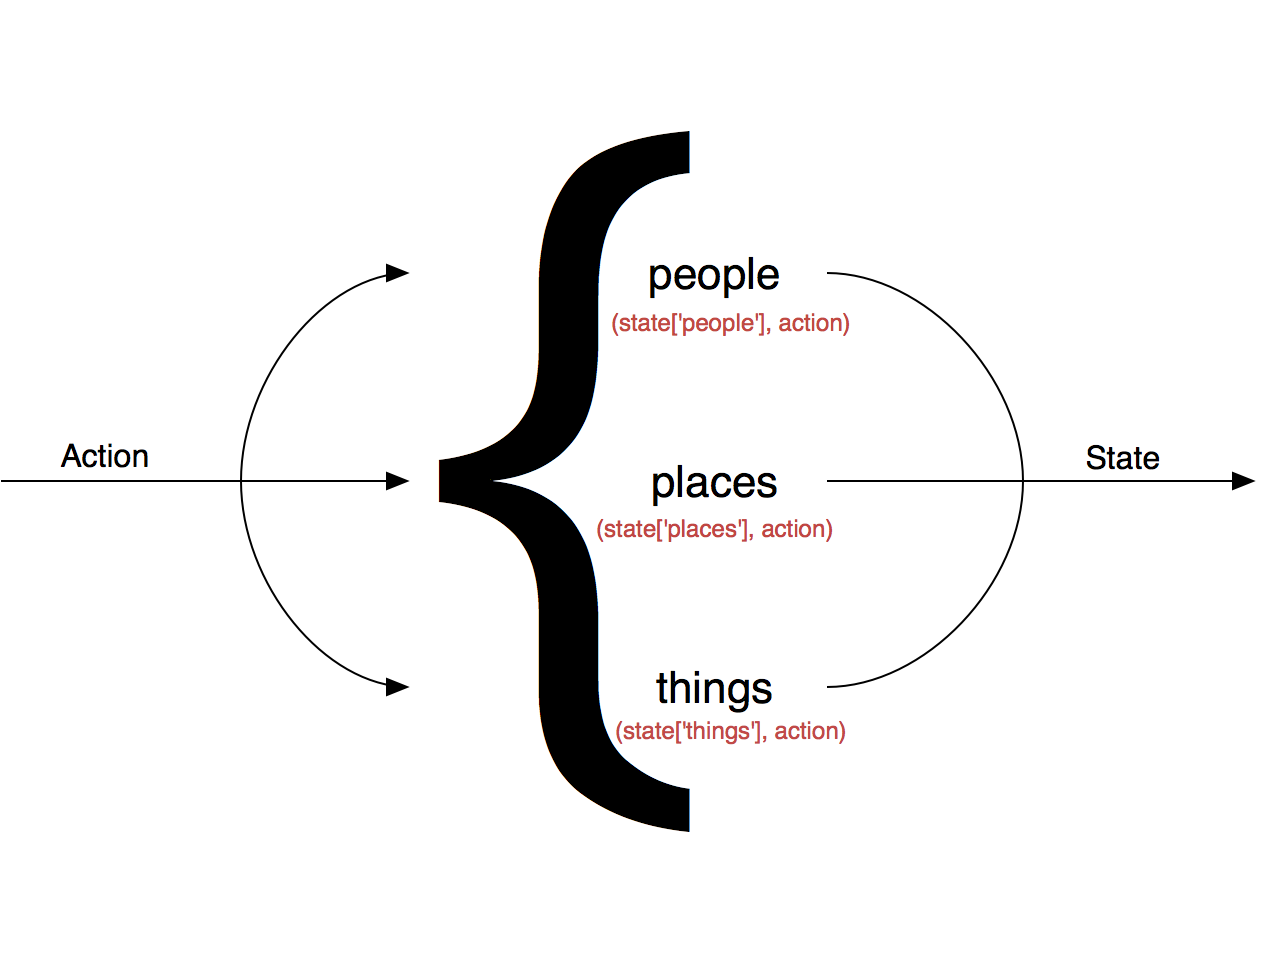
像传统数据一样,代表着应用的记录点,你的Store可以被认为是客户端"真实的数据来源" 或 数据库。在设计应用时都遵守一个Store的约定,Store任何时刻的存储快照都将只是呈现应用程序的完整状态。 一个单一的、不可变的状树,只有通过显式定义和调度才能更新。 中心化,不可变状态 ReducersStore应用程序的第二个组成部分是reducers。A2 reducer 是一个 a3纯函数,前一个状态和一个与事件相关联的类型和可选数据(playload)的Action。使用以前的说法是,如果Store被认为是客户端的数据库, 则reducers可以被认为是数据库中数据表。Reducers代表着应用程序的部分或状态片段,应相应的进行结构化和组合。 Reducer 接口2export interface Reducer<T> {
(state: T, action: Action): T;
}
A3函数的返回值类型由其输入值的类型决定的。 一个简单的Reducerexport const counter: Reducer<number> = (state: number = 0, action: Action) => {
switch(action.type) {
case 'INCREMENT':
return state + 1;
case 'DECREMENT':
return state -1;
default:
return state;
}
}
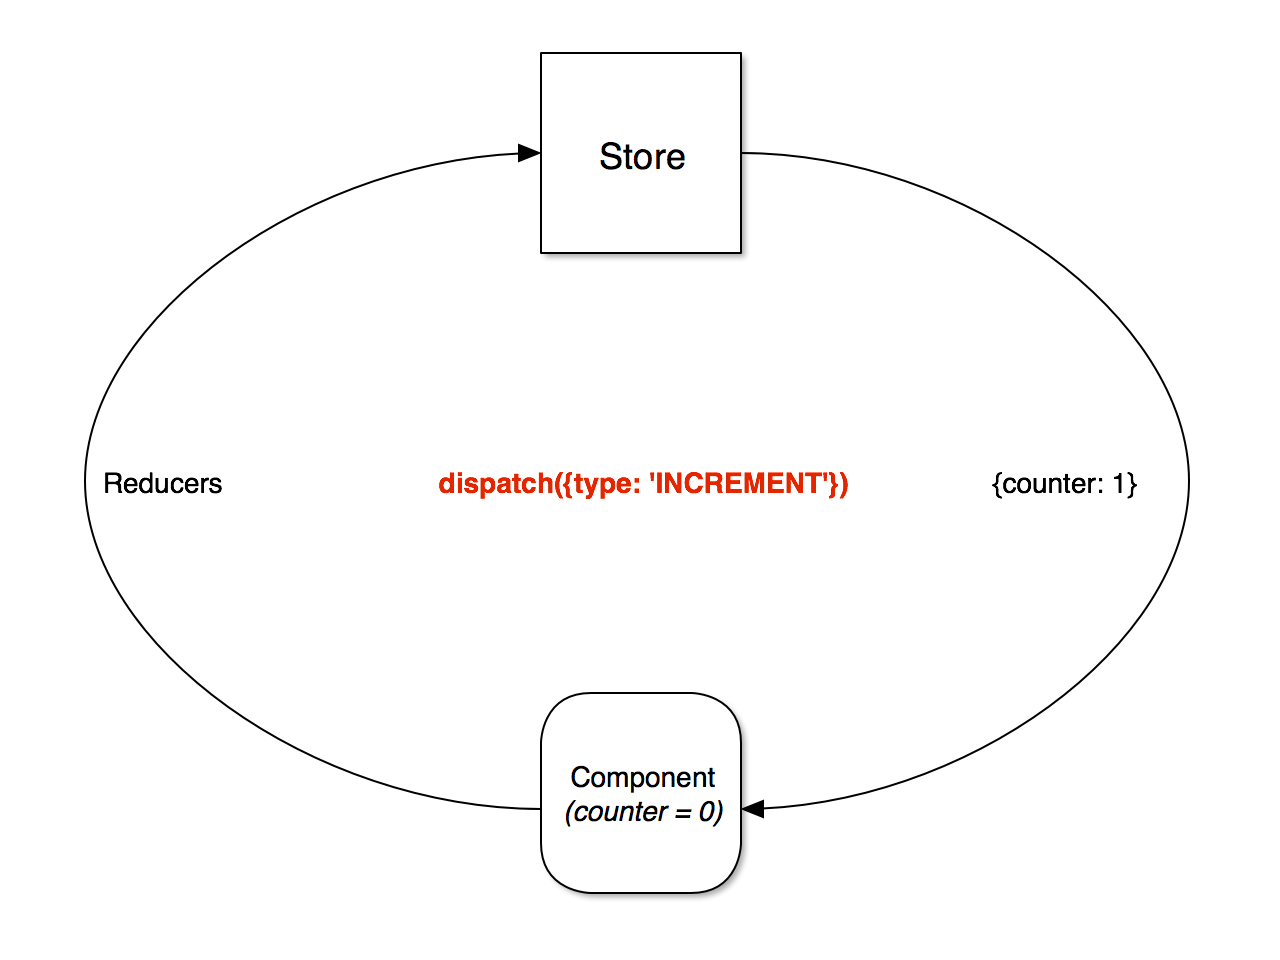
ActionsStore包含了我们应用程序的state和Reducers的输出部分,但是当状态需要更新时,我们如何与reducers通信呢?这是actions4,在Store应用程序中,所有导致状态更新的用户交互都必须以actions的形式表示。所有与用户相关的事件都被分派为action,经过Store的4个action通道,然后输出一个新的状态表示。每次调度一个action时都会发生这个过程,留下应用程序状态随时间变化的完整的,可序列话的表示形式。 Action接口4export interface Action {
type: string;
payload?: any;
}
派发Action的流水线5Actions简单示例//没带数据的action
dispatch({type: 'DECREMENT'});
//带数据的action
dispatch({type:ADD_TODO, payload: {id: 1, message: 'Learn ngrx/store', completed: true}});
数据投影最后,我们需要从Store中提取、组合和投影数据以显示在我们的视图中。因为Store本身是可观察的,所以我们可以访问你习惯的典型JS集合操作(map, filter, reduce等)以及强大的基于RxJS的可观察操作符。这将使得将Store数据分割成你希望很容易的投影。 状态投影//最简单的示例,从state获取people
store.select('people');
//合并多个state
Observable.combineLatest(
store.select('people'),
store.select('events'),
(people, events) => {
// 在此投影
}
)
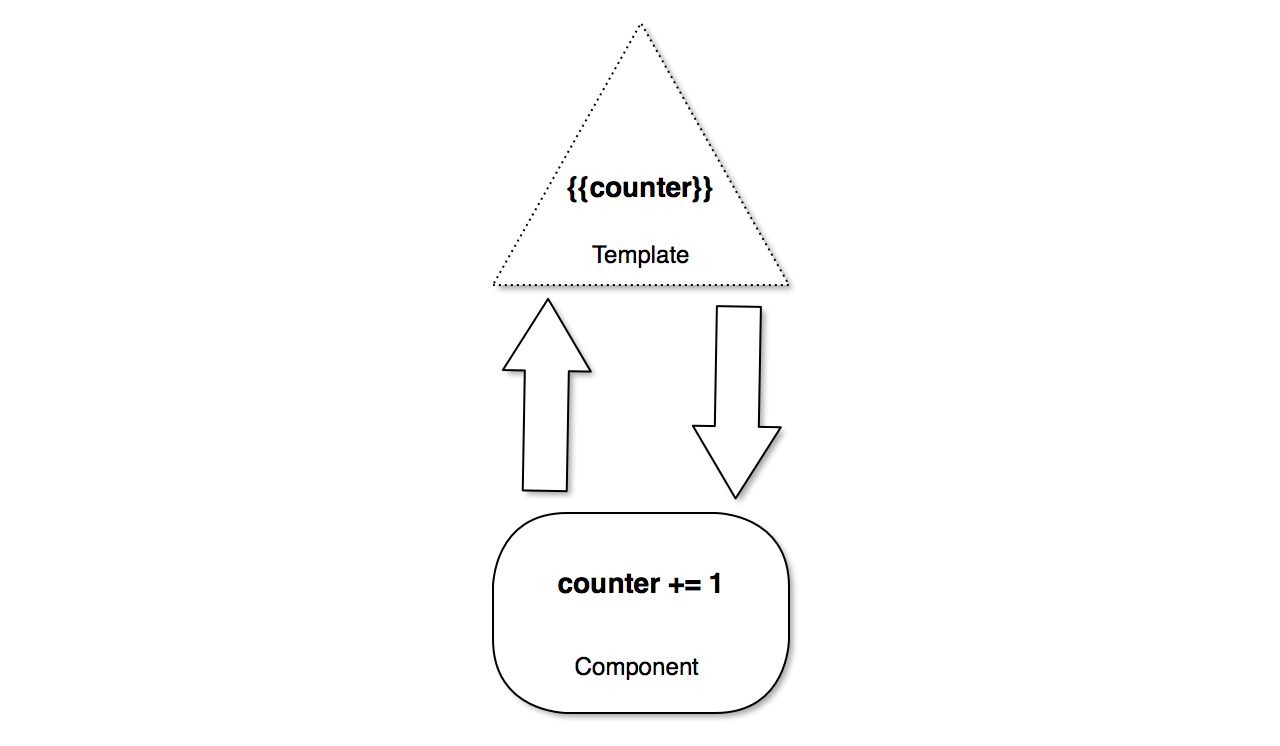
Not Your Classic Angular在上一节中,我提到了在开发应用程序时遵守的约定。在传统的设置和工作流程,你已经习惯了吗,这是什么意思?让我们一起来看看。 如果你是从Angular1转过来的,你会很熟悉数据的双向绑定6。控制器把model绑定到视图,反之亦然。这种方法的问题出现在你的视图变得更新复杂时,需要控制器和指令来管理并表示重要的状态随时间的变化。这很快变成一个噩梦,无论是推理还是调度,因为一个变化会影响另一个变化,另一个又影响另一个......等等。 Store提升了单向数据流7和显式调度操作的概念。的感受状态更新都缓存在组件中,委托给reducer。在应用程序中启动状态更新的唯一办法是通过调度操作,对应于特定的reducer案例。这不仅使你应用程序的状态改变变得简单,因为更新是集合在一起的,它会在出现错误时留下清晰的线索。 双向数据绑定66 Two-Way Data Binding单向数据绑定不使用Store的Counter示例(在线演示) @Component({
selector:'counter',
template: `
<div class='counter'>
<button (click)='increment()'>+</button>
<button (click)='decrement()'>-</button>
<h3>{{counter}}</h3>
</div>
`
})
export class Counter {
counter = 0;
increment() {
this.counter += 1;
}
decrement() {
this.counter -= 1;
}
}
使用Store的Counter示例(演示) @Component({
selector: 'counter',
template: `
<div class='content'>
<button (click)="increment()">+</button>
<button (click)="decrement()">-</button>
</div>
`,
changeDetection: ChangeDetectionStrategy.OnPush
})
export class Counter {
counter$: Observable<number>;
constructor(
private store: Store<number>
){
this.counter$ = this.store.select('counter');
}
increment(){
this.store.dispatch({type:'INCREMENT'});
}
decrement(){
this.store.dispatch({type:'DECREMENT'});
}
}
Store的优势在整个概述中,我们简要介绍了利用Store在一种典型的Angular 1风格方法的优势,现在让我们发一点时间来回顾一下。为什么要花时间在这个特定的库,构建和曲线上投资呢?Store的优势是状态中心化,性能,测试。 中心化,状态不可变所有相关应用程序的状态都缓存在一个位置。这样可以很容易地跟踪问题,因为错误时的状态快照可以提供重要的见解,并且可以轻松的重新重现这个问题。这也使得众多困难问题,例如在Store应用程序的上下文中撤消/重做某一步骤,并且实现了更强大的功能的工具。 性能由于状态集合中应用程序的顶层,因为数据更新可以通过组件依赖于Store。Angular构建如这样的数据流布置进行优化,并且可以在组件依赖于没有发布新值的Observables的情况下禁用变化检测。在最佳的缓存解决方案中,这将是绝大多数组件。 测试所有状态更新都是在recudes中处理的,它们是纯函数。纯函数测试非常简单,因为它只是输入,反对输出。这样可以测试应用程序中最关键的方面,而无需使用mock,或其他的测试技巧,可以使测试复杂且容易出错。 工具与生态系统中心化的,不可变的状态还可以实现更强大的工具。一个这样的盒子是ngrx开发工具,它提供了action和状态变化的历史,允许在开发过程中进行8次遍历。Store提供的模式还允许一个易于实现中间件的丰富的生态系统。因为Store在分派action之前和之后都提供一个入口点,所以应用程序减少,如同步片状态到本地Store,高级日志记录和实现sagas这样的问题可以通过快速包和几行代理来解决。这个生态系统只会在未来几个月内增长。 操作调度action和状态更改的历史 ,以模拟应用程序交互的时间点。 @ngrx/store的构建模块在构建Store应用程序之前,首先来看看构建@ngrx/store的RxJS概念。首先理解这些概念,我们将来可以更有效地利用这个库。要详细说明下面的每个主题,请查看这些额外的资源。 声明:Mike Ryan和Rob Wormald的实际@ngrx/store代码显着更强大。这些示例旨在演示涉及的RxJS概念,并从库中移出"magic" Subject/Dispatch的探索Rx的信使们,你告诉我,我会告诉他们的..... (演示) @ngrx/store的两个支柱,Store和Dispatcher都扩展了RxJS主题。主题即是观察者(Observables)和观察者(Observers),这意味着你可以订阅Subject,但也可以将主题订阅源。在高级别科目可以被认为是信使或代理人。 因为Subject是Observables,你可以 "next" 或直接将值传递到流中。然后,该Subject的订阅将被通知发出值。在Store的上下文中,这些用户可能是一个Angular 服务, 组件或需要访问应用程序状态的任何内容。 订阅主题//创建一个主题
const mySubject = new Rx.Subject();
//添加订阅者
const subscriberOne = mySubject.subscribe(val => {
console.log('***SUBSCRIBER ONE***',val);
});
const subscriberTwo = mySUbject.subscribe(val => {
console.log('***SUBSCRIBER TWO***',val);
});
//发射subject的值到observers
mySubject.next('FIRST VALUE!');// ***SUBSCRIBER ONE*** FIRST VALUE! ** SUBSCRIBER TWO*** FIRST VALUE!
mySubject.next('SECOND VALUE!');//***SUBSCRIBER ONE*** SECOND VALUE! ***SUBSCRIBER TWO*** SECOND VALUE
在Store或Redux中,将action发送到应用程序中的Store是一种惯例。为了维护此API,Dispatcher扩展至Subject,将派生方法作为传递添加到传统的下一个方法。这被用于将值发送到Subject中,然后将这些值发送给子对象。 将Dispatcher继承自Subject/*
redux/ngrx-store 有一个dispatcher的概念,或者是面向应用程序Store发送操作的方法允许扩展Rx.Subject与我们的Dispatcher类来维护熟悉的术语。
*/
//从Subject中继承
class Dispatcher extends Rx.Subject {
dispatcher(value: any): void{
this.next(value);
}
}
//创建一个dispatcher(只是一个包含next的SUbject方法)
const dispatcher = new Dispatcher();
//添加订阅
const subscribeOne = dispatcher.subscribe(val => {
console.log('***SUBSCRIBER ONE***', val);
});
const subscribeTwo = dispatcher.subscribe(val => {
console.log('***SUBSCRIBER TWO***', val);
});
//将值发射到observers
dispatcher.dispatch('FIRST DISPATCHED VALUE!');
dispatcher.dispatch('SECOND DISPATCHED VALUE!');
BehaviorSubject/Store探索与Subject类似,但你说的最后一件事是什么?... (演示) 虽然Subject作为dispatcher完美地工作,但它们有一个问题可以防止他们适合Store。订阅Subject时,只接收订阅后发出的值。在不断添加和删除组件的环境中,这是不可接受的,在订阅时需要应用程序Store的最新的按需状态部分。 Subjects只接受订阅后发出的值 /*
现在我们有一个dispatcher, 让我们创建我们的Store来接收已经发送的action。
*/
class FirstStore extends Rx.Subject{}
const myFirstStore = new FirstStore();
//添加订阅者
const subscriberOne = myFirstStore.subscribe(val => {
console.log('***SUBSCRIBER ONE***', val);
});
const subscriberTwo = myFirstStore.subscribe(val => {
console.log('***SUBSCRIBER TWO***', val);
});
//现在,让超级dispatcher发布值到store
myFirstStore.next('FIRST VALUE!');
/*
我们在添加一个订阅者。
由于我们第一次实施Store是一个subject,订阅者只能看到发布的价值*AFTER*他们订阅之后。在这种情况下,订阅者3将不了解'FIRST VALUE!'
*/
const subscriberThree = myFirstStore.suscribe(val => {
console.log('***SUBSCRIBER THREE***', val);
});
幸运的是,RxJS为Subject处理这个问题提供了BehaviorSubject。 即BehviorSubject 封装了Subject的所有功能,但也可以在订阅后将改后发布的值返回给订阅都。这意味着组件和服务将始终可以访问最新(或初始值)应用程序状态和所有将来的更新。 BehaviorSubject订阅接收上一次发布的值/*
因为我们的组件需要查询当前状态,所以BehaviorSubject更适合Store。BehaviorSubjects具有Subject的所有功能,还允许设置初始值,以及在订阅时将所接收的最后一个值输出给所有观察者。
*/
class Store extends Rx.BehaviorSubject {
constructor(initialState: any){
super(initialState);
}
}
const store = new Store('INITIAL VALUE');
//添加一些订阅者
const storeSubscriberOne = store.subscribe(val => {
console.log('***STORE SUBSCRIBER ONE***', val);
});
//为了演示,手动发布值到store
const storeSubscriberTwo = store.subscribe(val => {
console.log('***STORE SUBSCRIBER TWO***', val);
});
//在'FIRST VALUE!' 发布之后添加另一个订阅者
//输出:***STORE SUBSCRIBER THREE*** FIRST STORE VALUE!
const subscriberThree = store.subscribe(val => {
console.log('***STORE SUBSCRIBER THREE***', val);
});
Store + Dispatcher数据流单状态树和单向数据流在Angular ... (演示) 为了store的上下文正常运行,dispatcher仍然需要一些工作。在Store应用程序中,所有dispatch的action必须通过特定的管道传递,才能将新的状态表示传递到store中,并发送给所有观察者。你可以将此视为工厂装配线,在这种情况下,线上的站是pre-middleare->reducers->post->middleware->store。 这个流水线的创建是在创建时dispatch传递给store处理的。然后,store下一个方法被覆盖,以便将新的状态表示传递到store之前,首先将所有的action都dispatch管道。这也允许通过dispatch汇集接收到的action。 现在,中间件和reducers的实现将被删除。 将Dispatcher与Store关联一起/*
所有action都应通过管道,然后新计算的状态通过store。
1.) Dispatched Action
2.) Pre-Middleware
3.) Reducers (return new state)
4.) Post-Middleware
5.) store.next(newState)
*/
class Dispatcher extends Rx.Subject{
dispatcher(value: any): void{
this.next(value);
}
}
class Store extends Rx.BehaviorSubject{
constructor(
private dispatcher,
initialState
){
super(initialState);
/*
所有dispatch的action在通过新状态之前 通过action管道传递到store
*/
this.dispatcher
//pre-middleware
//reducers
//post-middleware
.subscribe(state => super.next(state));
}
//首先通过分派action到管道并委托给store.dispatch
dispatch(value){
this.dispatcher.dispatch(value);
}
//覆盖store允许直接订阅action注通过store
next(value){
this.dispatcher.dispatch(value);
}
}
const dispatcher = new Dispatcher();
const store = new Store(dispatcher,'INITIAL STATE');
const subscriber = store.subscribe(val => console.log('VALUE FROM STORE: ${val}'));
/*
所有分派action首先流经管道,计算新状态然后传递到store。总结一下,我们的理想行为分派action->premiddleware->reducers->post-middleware->store.next(newState)
*/
//两种方法在幕后都是相同的
dispatcher.dispatch('DISPATCHED VALUE!');
store.dispatch('ANOTHER DISPATCHED VALUE!');
const actionStream$ = new Rx.Subject();
/*
覆盖store下一个方法允许我们将store直接订阅到action流,提供与手动调用store.dispatch或dispatcher.dispatch相同的行为
*/
actionStream$.subscribe(store);
actionStream$.next('NEW ACTION!');
什么是Reducer?像雪球一样下滑,reducer通过迭代累加... (演示) Reducers是基于任何store或Redux的应用基础,描述基于分派action类型的状态部分及其潜在转换。你的reducer的组合是在任何给定时间组成应用程序状态的表示。 在讨论如何创建和实现reducers之前 , 我们先来看看reduce函数。reduce需要一个数组,根据累加值和当前值运行一个函数,在完成后将数组递减一个值。你可以把reducers看成一个滚雪而下的雪橇,每一次变革都会变得很大。以相同的方式,减少reduce是通过迭代定义的函数应用于当前值的结果。 标准的Reduce/*
你可以想一下滚雪球的场景。每一次翻滚都会累加质量和体积直到到达底部。reduce也类似,返回的值传递给所有提供函数的下一个调用,直到源数组中的所有值都耗尽为止。让我们看看一些巩固概念的盒子。
*/
const numberArray = [1,2,3];
/*
1.) accumulator:1, current:2
2.) accumulator:3, current:3
Final: 6
*/
const total = numberArray.reduce((accumulator, current) => accumulator + current);
console.log('***TOTAL***:',${total});
//reduce操作的对象
const personInfo = [{name:'Joe'},{age:31},{birthday:'1/1/1985'}];
/*
1.) accumulator: {name: 'Joe'}, current: {age: 31}
2.) accumulator: {name: 'Joe', age:31}, current: {birthday: '1/1/1985'}
Final: {name: 'Joe', age:31, birthday: '1/1/1985'}
*/
const fullPerson = personInfo.reduce(accumulator, current) => {
return Object.assign({}, accumulator, current);
}
console.log('*** FULL PERSON***:',fullPerson);
const personInfoStart = [{name:'Joe'},{age: 31},{birthday:'1/1/1985'}];
/*
1.) accumulator: {favoriteLangue: 'JavaScript'}, current: {name: 'Joe'}
2.) accumulator: {favoriteLangue: 'JavaScript', name: 'Joe'}, current: {age: 31}
3.) accumulator: {favoriteLange: 'JavaScript', name: 'Joe', age: 31}, current: {birthday: '1/1/1985'}
Final: {favoriteLangue: 'JavaScript', name: 'Joe', age: 31, birthday: '1/1/1985'}
*/
const fullPersonStart = personInfo.reduce((accumulator, current) => {
return Object.assign({}, accumulator, current);
},{favoriteLangue:'JavaScript'});
console.log('***FULL PERSON START:', fullPersonStart);
受Redux的启发,@ngrx/store具有操纵特定状态的Reducer功能的概念。Reducer接受一个state和action作为参数,暴露一个switch语句(一般来说,尽管 这可以通过多种方式处理)定义reducer所涉及的action类型。每次分派一个action时,将调用注册到store的每个reducer(通过根reducer, 在应用程序引导时在provideStore中创建),传递该状态片段(累加器)的当前状态和已分派的action。如果reducer没有被注册来处理该action类型,则将执行适当的状态计算和状态输出的表示。如果 没有那么该部分的当前 状态将被返回。这是Store和Redux的状态管理核心。 Store / Redux 风格的Reducer// Redux风格的Reducer
const person = (state = {}, action ) => {
switch(action.type){
case 'ADD_INFO':
return Object.assign({}, state, action.payload);
default:
return state;
}
}
const infoAction = {type: 'ADD_INFO', payload: {name:'Brian', framework:'Angular'}};
const anotherPersonInfo = person(undefined, infoAction);
console.log('***REDUX STYLE PERSON***:', anotherPersonInfo);
//添加其他reducer
const hoursWorked = (state = 0, action) => {
switch(action.type) {
case 'ADD_HOUR':
return state + 1;
case 'SUBTRACT_HOUR':
return state -1;
default:
return state;
}
}
//组合Reducers更新数据
const myReducers = { person, hoursWorked};
const combineReducers = reducers => (state = {}, action) => {
return Object.keys(reducers).reduce((nextState, key) => {
nextState[key] = reducers[key](state[key],action);
return nextState;
}, {});
};
/*
这让我们大部的方式在那里,但真正希望我们想要的是第一个和第二个的值累加随着action随着时间推移。幸运的是,RxJS为这处情况提供了完美的操作符,将在下一课中讨论。
*/
const rootReducer = combineReducers(myReducers);
const firstState = rootReducer(undefined, {type:'ADD_INFO', payload:{name: 'Brian'}});
const secondState = rootReducer({hoursWorked: 10, person: {name: 'Joe'}},{type:'ADD_HOUR'});
console.log('***FIRST STATE***:',firstState);
console.log('***SECOND STATE***:',secondState);
通过根Reducer分派action9使用scan操作符聚合状态类似于reduce,但值随着时间的推移累加。。。 scan操作符以类似的方式扮作reduce,除了累加器随时间保持,或直接scan应用的可观察完成。例如,当分派action和新的状态输出时,scan函数 中的累加器将始终是状态的最后一个输出表示形式。这减轻了需要维护store中的状态副本以传递给我们的reducer。 scan操作符的基本示例const testSubject = new Rx.Subject();
//scan示例,从0开始每次累加
const basicScan = testSubject.scan((acc, curr) => acc+ curr, 0);
// 记录累加值
const subscribe = basicScan.subscribe(val => console.log('Accumulated total:', val));
//传递值到我们的testSubject,并累加当前值
testSubject.next(1);//1
testSubject.next(2);//2
testSubject.next(3);//3
const testSubjectTwo = new Rx.Subject();
// scan示例随着时间的推移建立对象
const objectScan = testSubjectTwo.scan((acc, curr) => Object.assign({}, acc,curr), {});
// 记录累加值
const subscribe = objectScan.subscribe(val => console.log('Accumulated object:', val));
//传递值到testSubject,添加属性到一个新对象
testSubjectTwo.next({name: 'Joe'});
testSubjectTwo.next({age: 30});
testSubjectTwo.next({favoriteFramework: 'Angular 2'});// {name: 'Joe', age: 30, favoriteFramework: 'Angular 2'}
为了在应用程序store中使用scan,它只需要操作符应用于dispatcher程序。所有分派的action都将通过scan,调用具有当前state和action组合的reducer,输出新的状态表示。然后,就的应用程序状态被关闭,或被推送到store,并发送给所有订阅者。 使用scan做store存储class Store extends Rx.BehaviorSubject{
constructor(
private dispatcher,
private reducer,
initialState = {}
){
super(initialState);
this.dispatcher
// pre-middleware?
/*
前面我们把reduce比喻成一个雪球,越滚越大(或在原来的基础上累加)。scan也是类似行为。累加器(在这个示例中是,state)它将会继续累加前面的数据直到终止。这使得他它成为管理应用程序状态的理想操作符。
*/
.scan((state, action) => this.reducer(state, action), initialState)
//post-middleware?
.subscribe(state => super.next(state));
}
// ... store implementation
}
使用let管理中间件让我拥有整个可观察的。。。 (let demo | store demo) 中间件已经在ngrx/store v2中移出了。通这个部分来阅读本书,以了解let操作符,因为它可以与选择器一起使用。 虽然大多数运算符都是从可观察的值传递出来的,但是我们可以把整个可观察的数据传递出去在返回源可观察数据之前,这允许有机会处理额外的操作符和功能。虽然这可能看起来像一个小小的细微差别,但它完全适合于中间件或选择器(稍后讨论)的情况,消费者想要定义一个可利用的,可重复使用的代码块,以插入到可观察链中的特定时隙。 let 的基本功能const myArray = [1,2,3,4,5];
const myObservableArray = Rx.Observable.fromArray(myArray);
const test = myObservableArray
.map(val => val +1)
//这里会失败,let 与多数的操作符不一样
//.let(val => val + 2)
.subscribe(val => console.log('VALUE FROM ARRAY:', val));
const letTest = myObservableArray
.map(val => val +1)
//let 操作符拥有整个observable
.let(obs => obs.map(val => val +2))
.subscribe(val => console.log('VALUE FROM ARRAY WITH let :', val));
//let 操作符提供灵活度,添加多个操作符到源observable然后返回
const letTestThree = myObservableArray
.map(val => val +1)
//let 操作符拥有整个observable
.let(obs => obs
.map(val => val +2)
.filter(val => val % 2 === 0)
)
.subscribe(val => consle.log('let WITH MULTIPLE OPERATORS:', val));
//传递你的函数来添加操作符到observable
const obsArrayPlusYourOperators = (yourAppliedOperators) => {
return myObservableArray
.map(val => val +1 )
.let(yourAppliedOperators)
};
const addTenThenTwenty = obs => obs.map(val => val + 10).map(val => val + 20);
const letTestFour = obsArrayPlusYourOperators(addTenThenTwenty)
.subscribe(val => console.log('let FROM FUNCTION:', val));
let 操作符非常适合@ngrx/store中间件,因为用户在reducer输出状态之前 或之后添加自定义功能需要一个入口点,这是在@ngrx/store中如何应用前后中间件的基础。 添加let 操作符到中间件的入口class Store extends Rx.BehaviorSubject{
constructor(
private dispatcher,
private reducer,
preMiddleware,
postMiddleware,
initialState = {}
){
super(initialState);
this.dispatcher
//let 操作符接受整个源observable,返回一个新的observable
//@ngrx/store 组成中间件,所以你可以提供多个功能
//在我们下面的示例中,会接受一个前件和一个后件
//中间件标识:(obs) => obs
.let(preMiddleware)
.scan((state, action) => this.reducer(state,action),initialState)
.let(postMiddleware)
.subscribe(state => super.next(state));
}
// ... store implementation
}
const preMiddleware = obs => { return obs.do(val => console.log('ACTION:', val))};
const postMiddleware = obs => {return obs.do(val => console.log('STATE:', val))};
... create store supplying middleware
我们来回顾一下之前的内容:
这是store内部工作的要点。 使用map 操作符修改state我会把复杂的片段... (demo) 从集合中投影数据的基石功能是map。map将指定的函数 应用于一项,返回该荐的新结果。因为应用程序状态的键/值对象映射,所以提供一个辅助函数 来简单的返回基于字符 串或任何其他相关选择器的请求的状态片段。 通过map操作符转换stateclass Dispatcher extends Rx.Subject{
dispatch(value: any) : void{
this.next(value);
}
}
class Store extends Rx.BehaviorSubject{
constructor(
private dispatcher,
private reducer,
preMiddleware,
postMiddleware,
initialState = {}
){
super(initialState);
this.dispatcher
.let(preMiddleware)
.scan((state,action) => this.reducer(state, action), initialState)
.let(postMiddleware)
.subscribe(state => super.next(state));
}
//map 可以很容易的选择组件所需的状态片段
//这个一种简单的辅助功能,使得state的抓取部分更加简洁
select(key:string){
return this.map(state => state[key]);
}
// ... store implemenetation
}
//... create store
//使用store的select辅助
const subscriber = store
.select('person')
.subscribe(val => console.log('VALUE OF PERSON:', val));
使用distinctUntilChanged管理状态更新改变之前不要调用我 (distinctUntilChanged demo | store demo) 我们应用程序中的每个视图都只关心自己的状态片段。由于性能原因,我们不希望从所选状片段中发出新值,除非已进行更新。幸运的是,对于我们来说,RxJS有一个很好用的操作符做这事(注意趋势)。distinctUntilChanged操作符将仅在下一个值为唯一时基于先前发出的值发出。在数字和字符串的情况下,这意味着相等的数字和字符串,在对象的情况下,如果 对象引用是相同的新对象将不会被发出。 在基本类型与引用类型上使用distinctUntilChanged//只会输出唯一的值,同时是基于最新发出的值
const myArrayWithDuplicateInARow = new Rx.Observable
.fromArray([1,1,2,2,3,1,2,3]);
const distinctSub = myArrayWithDuplicatesInARow
.distinctUntilChanged()
//output: 1,2,3,1,2,3
.subscribe(val => console.log('DISTINCT SUB:',val));
const nonDistinctSub = myArrayWithDuplicatesInARow
//output: 1,1,2,2,3,1,2,3
.subscribe(val => console.log('MON DISTINCT SUB:', val));
const sampleObject = {name: 'Test'};
const myArrayWithDuplicateObjects = new Rx.Observable.fromArray([sampleObject,sampleObject,sampleObject]);
//只输出唯一的对象,同时是基于最新发出的值
const nonDistinctObjects = myArrayWithDuplicateObjects
.distinctUntilChanged()
//output: 'DISTINCT OBJECTS: {name: 'Test'}
.subscribe(val => console.log('DISTINCT OBJECTS:',val));
回想一下,store的reducers始终具有默认的情况,如果与分派的action不相关,则返回上一个状态。这意味着,在应用程序中选择状态片段时,除非更新了特定的片段,否则不会接收更新。这有助于使你的Store应用程序更有效率。 在Store中使用distinctUntilChangedclass Dispatcher extends Rx.Subject {
dispatch(value:any) : void{
this.next(value);
}
}
class Store extends Rx.BehaviorSubject{
constructor(
private dispatcher,
private reducer,
preMiddleware,
postMiddleware,
initialState = {}
){
super(initialState);
this.dispatcher
.let(preMiddleware)
.scan((state, action) => this.reducer(state,action), initialState),
.let(postMiddleware)
.subscribe(state => super.next(state));
}
/*
distinctUntilChanged仅在输出不同时才发出新值,最后发出的值。在下面的示例中,distinctUntilChanged操作符的可观察值将发送一个较小的值,而另一个仅使用map操作符。
*/
select(key:string){
return this.map(state => state[key])
.distinctUntilChanged();
}
}
// add reducers
// configure store
const subscriber = store
//使用distinctUntilChanged
.select('person')
.subscribe(val => console.log('PERSON WITH DISTINCTUNTILCHANGED:', val));
const subscriberTwo = store
//没有使用distinctUntilChanged, 将会打印数据
.map(state => state.person)
.subscribe(val => console.log('PERSON WITHOUT DISTINCTUNTILCHANGED:', val));
// dispatch a few actions
dispatcher.dispatch({
type:'ADD_INFO',
payload:{
name:'Brian',
message:'Exporing Reduce!'
}
});
// person不会被改变
dispatcher.dispatch({
type:'ADD_HOUR'
});
演练一个简单的应用程序我们将要创建的示例程序10是一个简单入门的应用。用户应该能够输入参加者及其客人的列表,跟踪认证确认出席者,通过特定标准过滤与会者,并快速查看有关活动的重要统计信息。在整个应用程序的创建过程中,我们将探讨@ngrx/stre的核心概念,并讨论流行的模式和最佳做法。 在每个部分上方提供了两个链接 ,工作和完成课程。如果 你希望按照概念进行编码,则每个课程的开始时,'工作'链接 将取提取。否则,"完成课程"链接 允许你从当前课程的终点开始。 不多说了,我们开始吧。 Party Planner应用程序结构图10设置第一个Reducer(Work Along | Completed Lesson) Reducer是你应用程序的基础。随着应用程序缓存维护状态,reducer是动态调度时action和输出新状态表示的主要内容。每个reducer应该集中在与数据库的表类似的特定部分或状态片段上。 创建reducer是很简单的一旦习惯了一个常见的成语,从不改变以前的状态,并总是返回一个新的状态表示,当相关的action被调度。如果 你是新来的store或Redux模式,这需要一些习惯来感觉自然。而不是使用诸如推送或重新分配先前存在的对象的变量的方法,而是依靠没有改变的方法,如concat和Object.assign来返回新值。还困惑吗?让我们来看看个人在实践中与其他的reducer有什么关系。 person的reducer需要处理5个action,移出一个person,向guest添加一个guest,从一个person中移出guest,并切换他们是否参加活动。为此, 我们将创建一个reducer函数 ,接受以前的状态和当前 调度的action。然后,我们需要实现一个case语句,在执行相关action时执行正常的状态重新计算。 Person Reducerconst details = (state, action) => {
switch(action.type){
case ADD_GUEST:
if(state.id === action.payload){
return Object.assign({}, state, {guest: state.guests + 1});
}
return state;
case REMOVE_GUEST:
if(state.id === action.payload){
return Object.assign({}, state, {guest: state.guest - 1});
}
return state;
case TOGGLE_ATTENDING:
if(state.id === action.payload){
return Object.assign({}, state,{attending: !state.attending});
}
return state;
default:
return state;
}
}
//切记,要避免reducers内部的直接改变
export const people = (state = [], action) => {
switch(action.type){
case ADD_PERSON:
return [
...state,
Object.assign({}, {id: action.payload.id, name: action.payload, guests: 0, attending: false})
];
case REMOVE_PERSON:
return state
.filter(person => person.id !=== action.payload);
//为了简单语句,把更新放到dtails上
case ADD_GUEST:
return state.map(person => detail(person, action));
case REMOVE_GUEST:
return state.map(person => details(person, action));
case TOGGLE_ATTENDING:
return state.map(person => details(person, action));
//当没有合适的action时,始终会返回先前状态的默认值
default:
return state;
}
}
配置Store中的actions(Work Along | Completed Lesson) 在store应用程序中修改state的唯一方式是通过dispatch。因此 ,action的记录应该是很清晰的,可读的用户交互历史。action通常定义为字符串常量或封装特定操作类型的服务上的静态字符串值。在后一种情况下,提供功能以返回给定正常输入的适当动作。这些方法有助于标准化你的操作,同时提供额外的类型安全性,被称之为action的创建者。 对于我们的就应用程序,我们将每个应用程序action导出字符 串常量。然后,这些将用于我们reducer案例语句的关键字以及每个派生action的类型。 初始化Actions//Person 的Action常量 export const ADD_PERSON = 'ADD_PERSON'; export const REMOVE_PERSON = 'REMOVE_PERSON'; export const ADD_GUEST = 'ADD_GUEST'; export const REMOVE_GUEST = 'REMOVE_GUEST'; export const TOGGLE_ATTENDING = 'TOOGLE_ATTENDING'; Components Container的使用(Work Along | Completed Lesson) 在你的应用程序中组件分为两类,smart11和dumb。那怎么区别哪个一个是start component,哪一个是dumb component? Smart 或Container 组件应该作为你的首层组件,或路由组件 。这些组件通常可以直接访问store或导出组件。Smart Component组件通过服务或直接处理视图event和action的dispatch。同时,Smart Component组件还处理在同一视图中从子组件发出的事件逻辑处理。 Dumb或Child组件通常仅作为显示内容,仅依赖于@Input参数 ,以及合理的方式处理接收到的数据 。当相关事件性在dump components时,它们通过emit操作发射出来,交由smart父组件处理。你应用程序中将大部分由dump组件构成,因为他们是独立的,聚焦的,并且是可重复利用的。 part planner应用程序需要一个container component。该组件将负责将适当的状态转交给每个子组件,并根据dumb component,person-input,person-list,以及以后的part-stats发出的事件进行调度。 Container Component@Component({
selector: 'app',
template: `
<h3>@ngrx/store Party Planner</h3>
<person-input
(addPerson)="addPerson($event)"
>
</person-input>
<person-list
[people]="people"
(addGuest)="addGuest($event)"
(removeGuest)="removeGuest($event)"
(removePerson)="removePerson($event)"
(toggleAttending)="toggleAttending($event)"
>
</person-list>
`,
directives: [PersonList, PersonInput]
})
export class App {
public people;
private subscription;
constructor(
private _store: Store
){
/*
示例没有使用async管道,
我们将在下一小节探索async管道
*/
this.subscription = this._store
.select('people')
.subscribe(people => {
this.people = people;
});
}
//所有action状态的改变都被转发到reducer处理
addPerson(name) addPerson(name){
this._store.dispatch({type: ADD_PERSON, payload: {id: id(), name})
}
addGuest(id){
this._store.dispatch({type: ADD_GUEST, payload: id});
}
removeGuest(id){
this._store.dispatch({type: REMOVE_GUEST, payload: id});
}
removePerson(id){
this._store.dispatch({type: REMOVE_PERSON, payload: id});
}
toggleAttending(id){
this._store.dispatch({type: TOGGLE_ATTENDING, payload: id})
}
/*
如果我没有使用async管道而是手动创建订阅(subscriptions),则需要在ngOnDestroy中取消订阅(unsubscribe)
*/
ngOnDestroy(){
this.subscription.unsubscribe();
}
}
Dumb Component - PersonList@Component({
selector: 'person-list',
template: `
<ul>
<li
*ngFor="let person of people"
[class.attending]="person.attending"
>
{{person.name}} - Guests: {{person.guests}}
<button (click)="addGuest.emit(person.id)">+</button>
<button *ngIf="person.guests" (click)="removeGuest.emit(person.id)">-</button>
Attending?
<input type="checkbox" [(ngModel)]="person.attending" (change)="toggleAttending.emit(person.id)" />
<button (click)="removePerson.emit(person.id)">Delete</button>
</li>
</ul>
`
})
export class PersonList {
/*
"dumb"组件接收input输入和显示数据,发送相关事件到父组件 或container组件处理,除此之外什么也不做。
*/
@Input() people;
@Output() addGuest = new EventEmitter();
@Output() removeGuest = new EventEmitter();
@Output() removePerson = new EventEmitter();
@Output() toggleAttending = new EventEmitter();
}
Dumb Component - PersonInput@Component({
selector: 'person-input',
template: `
<input #personName type="text" />
<button (click)="add(personName)">Add Person</button>
`
})
export class PersonInput {
@Output() addPerson = new EventEmitter();
add(personInput){
this.addPerson.emit(personInput.value);
personInput.value = '';
}
}
Smart Container11 和 Dumb ComponentsAsyncPipe管道的使用(Work Along | Completed Lesson) 在Angular中AsyncPipe是一个独特的,状态化的管道,可以处理Observables和Promises。当在具有Observables的模板表达式中使用AsyncPipe管道时,使用了Observable可subscribe的功能,并且在视图中显示emit的值。该管道还可以自动取消订阅,从而节省了在ngOnDestroy中手动取消订阅的麻烦。在Store应用程序中,你会发现在视图组件中所有的组件都使用了AsyncPipe管道,且还很难知道发生了什么。有关AsyncPipe是如何工作的更详细解释,请查看我的文章了解和使用Angular的AsyncPipe或egghead.io上AsyncPipe的免费视频。 在我们的模板中使用AsyncPipe是很简单的。你可以通过async操作符传递Observable(或Promise),并创建订阅对象,通过async管道符解析的数据更新模板。因为我们使用了AsyncPipe管道,我们还可以从组件的构造函数和生命周期钩子函数 ngOnDestroy中手动取消订阅。现在我们使用AsyncPipe默认自动处理。 重构为AsyncPipe管道@Component({
selector: 'app',
template: `
<h3>@ngrx/store Party Planner</h3>
<person-input
(addPerson)="addPerson($event)"
>
</person-input>
<person-list
[people]="people | async"
(addGuest)="addGuest($event)"
(removeGuest)="removeGuest($event)"
(removePerson)="removePerson($event)"
(toggleAttending)="toggleAttending($event)"
>
</person-list>
`,
directives: [PersonList, PersonInput]
})
export class App {
public people;
private subscription;
constructor(
private _store: Store
){
/*
people的Observable对象,在我们的模板中使用async管道,这将会被自动订阅,使用新解析的数据显示在我们的模板上。
当组件销毁时,会自动解除订阅
*/
this.people = _store.select('people');
}
//所有状态的改变都会通过dispatch转发与处理
addPerson(name){
this._store.dispatch({type: ADD_PERSON, payload: name})
}
addGuest(id){
this._store.dispatch({type: ADD_GUEST, payload: id});
}
removeGuest(id){
this._store.dispatch({type: REMOVE_GUEST, payload: id});
}
removePerson(id){
this._store.dispatch({type: REMOVE_PERSON, payload: id});
}
toggleAttending(id){
this._store.dispatch({type: TOGGLE_ATTENDING, payload: id})
}
//在ngOnDestroy中不再需要手动取消订阅
}
使用ChangeDetection.OnPush(Work Along | Completed Lesson) 在Angular中使利用中央状态树,可以带来可预测性和可维护性,同时还有提升性能。为了体现这一性能优势,我们可以使用ChangeDetection.OnPush。 OnPush背景的概念很简单,当组件仅依赖于输入,而这些输入的引用没有发生改变,Angular就可以跳过组件的变化检测。如前所述,所有state的委托应该在smart component或顶级组件中处理。这使我们的应用程序大多数组件完全依赖于输入,安全地允许我们在组件 中将ChangeDetectionStrategy设置为OnPush。组件可以跳过组件的变化检测,直到必要时,它将会给我们免费提升性能。 使用OnPush更改组件的变化检测,我们需要在@Component装饰器中修改changeDetection属性设置为ChangeDetection.OnPUsh。,如此,现在Angular将会跳过这些组件和子组件的变化检测,直到输入的引用改变。 更新为ChangeDetection.OnPush@Component({
selector: 'person-list',
template: `
<ul>
<li
*ngFor="let person of people"
[class.attending]="person.attending"
>
{{person.name}} - Guests: {{person.guests}}
<button (click)="addGuest.emit(person.id)">+</button>
<button *ngIf="person.guests" (click)="removeGuest.emit(person.id)">-</button>
Attending?
<input type="checkbox" [(ngModel)]="person.attending" (change)="toggleAttending.emit(person.id)" />
<button (click)="removePerson.emit(person.id)">Delete</button>
</li>
</ul>
`,
changeDetection: ChangeDetectionStrategy.OnPush
})
/*
使用OnPush改变变化检测,使得组件仅依赖于输入引用的变化 ,这将大大提升应用程序的性能。
*/
export class PersonList {
/*
"dumb"组件基于输入显示数据和发射相关的事件给父组件或"container"组件处理,除此之外没有别的。
*/
@Input() people;
@Output() addGuest = new EventEmitter();
@Output() removeGuest = new EventEmitter();
@Output() removePerson = new EventEmitter();
@Output() toggleAttending = new EventEmitter();
}
State扩展(Work Along | Completed Lesson) 多数Store应用程序都是由多个reducer组成的,每个reducer都可以管理自己的状态。对于这个示例,我们有两个reducer,一个用于管理part attendees,另一个应用于列表当前 action的过滤器。我们首先定义action的常量,指定用户应用可以应用的过滤器。 我们先创建partFilter的reducer。对于此我们有几个选项。首先是简的返回filter的过滤器字符串。然后,我们可以编写一个基于当前action的过滤器过滤列表的服务或组件中的方法。虽然这个做还不错,但是根据当前的过滤器状态返回应用于part list的功能是更可扩展的。在将来,添加更多的过滤器就像创建一个新的case语句一样适当简单的返回对应的投影处理函数。 Part Filter Reducerimport {
SHOW_ATTENDING,
SHOW_ALL,
SHOW_WITH_GUESTS
} from './actions';
//根据所选过滤器然后返回对应的结果
export const partyFilter = (state = person => person, action) => {
switch(action.type){
case SHOW_ATTENDING:
return person => person.attending;
case SHOW_ALL:
return person => person;
case SHOW_WITH_GUESTS:
return person => person.guests;
default:
return state;
}
};
Part Filter Actions//Party Filter常量 export const SHOW_ATTENDING = 'SHOW_ATTENDING'; export const SHOW_ALL = 'SHOW_ALL'; export const SHOW_WITH_GUESTS = 'SHOW_GUESTS'; Party FIlter Selectimport {Component, Output, EventEmitter} from "angular2/core";
import {
SHOW_ATTENDING,
SHOW_ALL,
SHOW_WITH_GUESTS
} from './actions';
@Component({
selector: 'filter-select',
template: `
<div class="margin-bottom-10">
<select #selectList (change)="updateFilter.emit(selectList.value)">
<option *ngFor="let filter of filters" value="{{filter.action}}">
{{filter.friendly}}
</option>
</select>
</div>
`
})
export class FilterSelect {
public filters = [
{friendly: "All", action: SHOW_ALL},
{friendly: "Attending", action: SHOW_ATTENDING},
{friendly: "Attending w/ Guests", action: SHOW_WITH_GUESTS}
];
@Output() updateFilter : EventEmitter<string> = new EventEmitter<string>();
}
视图中的状态片段(Work Along | Completed Lesson) @Component({
selector: 'app',
template: `
<h3>@ngrx/store Party Planner</h3>
<party-stats
[invited]="(people | async)?.length"
[attending]="(attending | async)?.length"
[guests]="(guests | async)"
>
</party-stats>
<filter-select
(updateFilter)="updateFilter($event)"
>
</filter-select>
<person-input
(addPerson)="addPerson($event)"
>
</person-input>
<person-list
[people]="people | async"
[filter]="filter | async"
(addGuest)="addGuest($event)"
(removeGuest)="removeGuest($event)"
(removePerson)="removePerson($event)"
(toggleAttending)="toggleAttending($event)"
>
</person-list>
`,
directives: [PersonList, PersonInput, FilterSelect, PartyStats]
})
export class App {
public people;
private subscription;
constructor(
private _store: Store
){
this.people = _store.select('people');
/*
this is a naive way to handle projecting state, we will discover a better
Rx based solution in next lesson
*/
this.filter = _store.select('partyFilter');
this.attending = this.people.map(p => p.filter(person => person.attending));
this.guests = this.people
.map(p => p.map(person => person.guests)
.reduce((acc, curr) => acc + curr, 0));
}
//...rest of component
}
@Component({
    selector: 'person-list',
    template: `
      <ul>
        <li
          *ngFor="let person of people.filter(filter)"
          [class.attending]="person.attending"
        >
           {{person.name}} - Guests: {{person.guests}}
           <button (click)="addGuest.emit(person.id)">+</button>
           <button *ngIf="person.guests" (click)="removeGuest.emit(person.id)">-</button>
           Attending?
           <input type="checkbox" [checked]="person.attending" (change)="toggleAttending.emit(person.id)" />
           <button (click)="removePerson.emit(person.id)">Delete</button>
        </li>
      </ul>
    `,
    changeDetection: ChangeDetectionStrategy.OnPush
})
export class PersonList {
    @Input() people;
    //for now, we will pass filter down and apply
    @Input() filter;
    @Output() addGuest = new EventEmitter();
    @Output() removeGuest = new EventEmitter();
    @Output() removePerson = new EventEmitter();
    @Output() toggleAttending = new EventEmitter();
}
//timerOne emits first value at 1s, then once every 4s
const timerOne = Rx.Observable.timer(1000, 4000);
//timerTwo emits first value at 2s, then once every 4s
const timerTwo = Rx.Observable.timer(2000, 4000)
//timerThree emits first value at 3s, then once every 4s
const timerThree = Rx.Observable.timer(3000, 4000)

//when one timer emits, emit the latest values from each timer as an array
const combined = Rx.Observable
.combineLatest(
    timerOne,
    timerTwo,
    timerThree
);

const subscribe = combined.subscribe(latestValues => {
    //grab latest emitted values for timers one, two, and three
    const [timerValOne, timerValTwo, timerValThree] = latestValues;
  /*
      Example:
    timerOne first tick: 'Timer One Latest: 1, Timer Two Latest:0, Timer Three Latest: 0
    timerTwo first tick: 'Timer One Latest: 1, Timer Two Latest:1, Timer Three Latest: 0
    timerThree first tick: 'Timer One Latest: 1, Timer Two Latest:1, Timer Three Latest: 1
  */
  console.log(
    `Timer One Latest: ${timerValOne},
     Timer Two Latest: ${timerValTwo},
     Timer Three Latest: ${timerValThree}`
   );
});

//combineLatest also takes an optional projection function
const combinedProject = Rx.Observable
.combineLatest(
    timerOne,
    timerTwo,
    timerThree,
    (one, two, three) => {
      return `Timer One (Proj) Latest: ${one},
              Timer Two (Proj) Latest: ${two},
              Timer Three (Proj) Latest: ${three}`
    }
);
//log values
const subscribe = combinedProject.subscribe(latestValuesProject => console.log(latestValuesProject));
//Create an observable that emits a value every second
const myInterval = Rx.Observable.interval(1000);
//Create an observable that emits immediately, then every 5 seconds
const myTimer = Rx.Observable.timer(0, 5000);
//Every time interval emits, also get latest from timer and add the two values
const latest = myInterval
  .withLatestFrom(myTimer)
  .map(([interval, timer]) => {
    console.log(`Latest Interval: ${interval}`);
    console.log(`Latest Timer: ${timer}`);
    return interval + timer;
  });
//log total
const subscribe = latest.subscribe(val => console.log(`Total: ${val}`));
@Component({
    selector: 'app',
    template: `
      <h3>@ngrx/store Party Planner</h3>
      <party-stats
        [invited]="(model | async)?.total"
        [attending]="(model | async)?.attending"
        [guests]="(model | async)?.guests"
      >
      {{guests | async | json}}
      </party-stats>
      <filter-select
        (updateFilter)="updateFilter($event)"
      >
      </filter-select>
      <person-input
        (addPerson)="addPerson($event)"
      >
      </person-input>
      <person-list
        [people]="(model | async)?.people"
        (addGuest)="addGuest($event)"
        (removeGuest)="removeGuest($event)"
        (removePerson)="removePerson($event)"
        (toggleAttending)="toggleAttending($event)"
      >
      </person-list>
    `,
    directives: [PersonList, PersonInput, FilterSelect, PartyStats]
})
export class App {
    public model;

    constructor(
     private _store: Store
    ){
      /*
        Every time people or partyFilter emits, pass the latest
        value from each into supplied function. We can then calculate
        and output statistics.
      */
      this.model = Observable.combineLatest(
          _store.select('people')
          _store.select('partyFilter'),
          (people, filter) => {
          return {
            total: people.length,
            people: people.filter(filter),
            attending: people.filter(person => person.attending).length,
            guests: people.reduce((acc, curr) => acc + curr.guests, 0)
          }
        });
    }
    //...rest of component
}
export const partyModel = () => {
  return state => state
    .map(([people, filter]) => {
      return {
            total: people.length,
            people: people.filter(filter),
            attending: people.filter(person => person.attending).length,
            guests: people.reduce((acc, curr) => acc + curr.guests, 0)
          }
    });
};
export const attendees = () => {
  return state => state
    .map(s => s.people)
    .distinctUntilChanged();
};

export const percentAttending = () => {
  return state => state
    //build on previous selectors
    .let(attendees())
    .map(p => {
      const totalAttending = p.filter(person => person.attending).length;
      const total = p.length;
      return total > 0 ? (totalAttending / total) * 100 : 0;
    });
};
export class App {
    public model;

    constructor(
     private _store: Store
    ){
      /*
        Every time people or partyFilter emits, pass the latest
        value from each into supplied function. We can then calculate
        and output statistics.
      */
      this.model = Observable.combineLatest(
            _store.select('people'),
            _store.select('partyFilter')
          )
          //extracting party model to selector
          .let(partyModel());
      //for demonstration on combining selectors
      this.percentAttendance = _store.let(percentAttending());
    }
    //...rest of component
}
interface Selector<T,V> {
  (state: Observable<T>): Observable<V>
}
//pre middleware takes an observable of actions, returning an observable
export const actionLogger = action => {
  return action.do(a => console.log('DISPATCHED ACTION:', a));
}
//post middleware takes an observable of state, returning observable
export const stateLogger = state => {
  return state.do(s => console.log('NEW STATE:', s));
}
bootstrap(App, [
  provideStore({people, partyFilter}),
  usePreMiddleware(actionLogger),
  usePostMiddleware(stateLogger)
]);
import {Injectable} from 'angular2/core';
//simple service wrapping local storage
@Injectable()
export class LocalStorageService {
    setItem(key, value){
      localStorage.setItem(key, JSON.stringify(value));
    }

    getItem(key){
      return JSON.parse(localStorage.getItem(key));
    }
}
/*
  create middleware with a dependency on the localStorageService
  basic example, accept state key to sync with local storage
*/
export const localStorageMiddleware = key => createMiddleware(localStorageService => {
  return state => {
    //sync specified state slice with local storage
    return state.do(state => localStorageService.setItem(key, state[key]));
  }
}, [LocalStorageService]);
import {provide, Provider} from 'angular2/core';
import {INITIAL_STATE} from '@ngrx/store';

export const rehydrateState = key => {
  //override initial state token for use in store
  return provide(INITIAL_STATE, {
    useValue: { [key]: JSON.parse(localStorage.getItem(key))};
  });
};
bootstrap(App, [
  LocalStorageService,
  provideStore({people, partyFilter}),
  usePreMiddleware(actionLogger),
  usePostMiddleware(stateLogger, localStorageMiddleware('people')),
  rehydrateState('people')
]);
export const RESET_STATE = 'RESET_STATE';

const INIT = '__NOT_A_REAL_ACTION__';

export const reset = reducer => {
    let initialState = reducer(undefined, {type: INIT})
    return function (state, action) {
      //if reset action is fired, return initial state
      if(action.type === RESET_STATE){
        return initialState;
      }
      //calculate next state based on action
      let nextState = reducer(state, action);
      //return nextState as normal when not reset action
      return nextState;
  }
}
bootstrap(App, [
  //wrap people in reset meta-reducer
  provideStore({people: reset(people), partyFilter})
]);
export function combineReducers(reducers: any): Reducer<any> {
  const reducerKeys = Object.keys(reducers);
  const finalReducers = {};

  for (let i = 0; i < reducerKeys.length; i++) {
    const key = reducerKeys[i];
    if (typeof reducers[key] === 'function') {
      finalReducers[key] = reducers[key];
    }
  }

  const finalReducerKeys = Object.keys(finalReducers);

  return function combination(state = {}, action) {
    let hasChanged = false;
    const nextState = {};
    for (let i = 0; i < finalReducerKeys.length; i++) {
      const key = finalReducerKeys[i];
      const reducer = finalReducers[key];
      const previousStateForKey = state[key];
      const nextStateForKey = reducer(previousStateForKey, action);

      nextState[key] = nextStateForKey;
      hasChanged = hasChanged || nextStateForKey !== previousStateForKey;
    }
    return hasChanged ? nextState : state;
  };
}
天之骄子 2017.8.20 深圳 |
|
|