|
 |
by Nancy Marchant

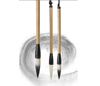
Rodekool: "Red cabbage" in Dutch
One of the most interesting design
elements of brioche knitting is that it creates
two separate yet connected layers making the
knitting reversible. Each of the layers can have
their own characteristics. The layers can be
different colors, different yarns and even worked
differently like adding increases on one side
and decreases on the other.
The “keyhole” in this scarf came naturally. You
begin with a 2-color brioche “lace” stitch pattern.
You use “make 1 (m1)” to increase and work 5 stitches
together to decrease.
After working the pattern and creating
one cabbage leaf, you separate the layers and work each layer
in ribbing, hence the keyhole. To continue, you place the stitches
back onto one needle and brioche to the following keyhole opening.
You finish by making the second cabbage leaf.
If you work this pattern in a thinner yarn such as a kid mohair/silk,
the pattern is then much “lacier”. |
If
you work with two high contrasting colors your result would be
distinctly reversible. Whatever your yarn choice, your “Rodekool” will always
be an attention-grabbing piece.
|
 model: Irma model: Irma
de Jong photos: Nancy
Marchant |
|
SIZE
One
|
 
|
FINISHED MEASUREMENTS
Width: 5.5 inches after blocking
Length: 30 inches after blocking
|
|
PATTERN NOTES
[Knitty's list of standard abbreviations and techniques can be found here.] |
Please familiarize yourself with the following
techniques:
You will also need to thoroughly understand the specific
brioche stitch abbreviations as described below. I suggest
that you practice this pattern using scrap yarn before
beginning the scarf.
In brioche knitting, a stitch with its yarnover is considered
ONE stitch. The yarnover is never counted
separately. This is very important
to remember – imagine
a stitch and its yarnover as a stitch
with a shawl around its shoulders.
Edge stitches are worked using MC only.
Mark one thread by hanging a marker on it as it comes
off the ball. This will be the MC. The
other unmarked thread will be the CC.
After a few rows, hang a marker
on the RS. Also hang a marker on the
middle stitch.
Brioche Terminology
brk (brioche knit - also known as a bark):
knit the stitch (which was slipped in the row before) together
with its yarnover.
brp (brioche purl - also known as a burp):
purl the stitch (which was slipped in the row before) together
with its yarn over.
4 stitch left slant decrease: Slip the
next 4 stitches knitwise, one at a time,
onto right needle, brk the following stitch, then pass
the 4 slipped stitches over the stitch just worked. 4 stitches
decreased. This places the first of the five stitches (the
marked stitch) on top of the others, and slants to the
left.
4 stitch right slant decrease: Brk1, place this stitch
back on left needle, pass the following 4 stitches over,
then return stitch to right needle. 4 stitches decreased.
This places the last of the 5 stitches on top of the others,
and slants to the right.
m1 (make 1): bring yarn between the needles
to front of work, then over right needle
to back of work. When m1 is followed by a yf sl1yo, you
will then need to again bring the yarn forward under needle
for the beginning of this next stitch.
sl1yof (slip 1, yarnover, yarn to front): with working
yarn in front, slip the next stitch purlwise, then bring
the yarn over the needle (and over the slipped stitch)
then back to the front and under the needle in position
to purl the following stitch.
yf sl1yo (yarn forward, slip 1 purlwise, yarnover): bring
the working yarn under the needle to the front of the work,
slip the next stitch purlwise, then bring the yarn over
the needle (and over the slipped stitch) to the back in
position to work the following stitch.
Rodekool Brioche Lace Stitch Pattern
Row 1 (RS, MC): K1, yf
sl1yo, m1, brk1, m1, yf sl1yo, [brk1, yf
sl1yo] twice, 4 stitch left slant dec, yf
sl1yo, [brk1, yf sl1yo] twice, m1, brk1, m1, yf sl1yo,
brk1, yf sl1yo, m1, brk1, m1, yf sl1yo, [brk1, yf
sl1yo] twice, 4 stitch right slant dec, yf
sl1yo, [brk1, yf sl1yo] twice, m1, brk1, m1,
yf sl1yo, k1. Do not turn; slide stitches back
to other end of needle.
brk1: This is the
middle stitch; it helps to hang a marker on
this stitch.
Row 1 (RS, CC): Sl1, brp1, sl1yof, p1, sl1yof,
[brp1, sl1yof] 5 times, brp1, sl1yof, p1, sl1yof,
brp1, sl1yof,
brp1, sl1yof, p1, sl1yof1, [brp1, sl1yof] 5 times, brp1,
sl1yof, p1, sl1yof, brp1, drop CC leaving yarn to front,
sl1. Turn work.
sl1yof: This is the middle stitch.
Note: In this row, the
first two and last two "sl1yof" stitches
in each half are worked over a yo, so you will
be slipping a yo as well as making one to form a double
yo.
Row 2 (WS, MC): P1, *[sl1yof, p2tog] twice, [sl1yof,
brp1] 5 times, [sl1yof, p2tog] twice, sl1yof*,
brp1, rep from *
to *, end with p1. Do not turn; slide.
brp1: This is the middle stitch.
Note: In the row above, the p2tog
is worked over a double yarnover.
Row 2 (WS, CC): Sl1, [brk1, yf sl1yo] rep to
last 2 stitches, brk1, drop CC leaving yarn
to back, sl1. Turn work. |
DIRECTIONS

this shows
the right side of scarf
[note single rib in center]
|
this shows wrong side of
scarf [note double rib in
the center]
|
Using Two-Color Italian Cast-On, cast on 41 stitches, beginning
and ending with MC knit stitch.
Set-Up Rows
Set-Up Row 1 (WS, MC): P1,
[sl1yof, p1] to end. Drop knotted stitch
from Two-Color Italian Cast-On. Do
not turn; slide stitches back to opposite
end of needle.
Set-Up Row 1 (WS, CC): Sl1, [brk1, yf sl1yo]
to last 2 stitches, brk1, drop CC leaving
yarn to back, sl1. Turn work.
Set-Up Row 2 (RS, MC): K1, [yf sl1yo, brk1] to
last two stitches, yf sl1yo, k1. Do not turn; slide.
Set-Up Row 2 (RS, CC): Sl1, [brp1, sl1yof] to
last 2 stitches, brp1, drop CC leaving yarn to front, sl1.
Turn work.
Set-Up Row 3 (WS, MC): P1, [sl1yof, brp1] to
last 2 stitches, sl1yof, p1. Do not turn; slide.
Set-Up Row 3 (WS, CC): Sl1,
[brk1, yf sl1yo] to last 2 stitches,
brk1, drop CC leaving yarn to back,
sl1. Turn work.
Begin Rodekool Brioche Lace Stitch Pattern.
Work in Rodekool Brioche Lace Stitch Pattern until you
are ready to work Row 25 (RS, MC).
Ribbed keyhole
Carefully divide the stitches by slipping
the MC stitches onto working needle and
CC stitches onto holding thread or
needle. You might first run a lifeline
through the CC stitches to keep from dropping one. 21
stitches MC and 20 stitches CC.
MC Ribbing
Ribbed Row 1 (RS, MC): K1,
place CC thread to back, brk1 to last
stitch, k1.
Ribbed Row 2 (WS, MC): [P1,
k1] to last stitch, p1.
Ribbed Row 3 (RS, MC): [K1,
p1] to last stitch, k1.
Rep last 2 rows for total of 16 rows
ending with a WS row.
Place these MC stitches on holding
thread or needle. Place CC stitches onto working needle.
CC Ribbing
Ribbed Row 1 (RS, CC): P all
stitches.
Ribbed Row 2 (WS, CC): [K1,
p1] to end.
Rep Ribbed Row 2 for total of 16 rows
ending with RS facing.
Place all stitches back onto working needle, alternating
MC stitch then CC stitch, beginning and ending with a MC
stitch.
Middle Lace Area of Scarf
Row 1 (RS, MC): K1, [yf sl1yo,
k1] to end. Do not turn; slide stitches
to other end of needle.
Row 2 (RS, CC): Sl1, [brp1,
sl1yof] to last 2 stitches, brp1, drop
CC leaving yarn to front, sl1. Turn
work.
Row 3 (WS, MC): P1, [sl1yof,
brp1] to last 2 stitches, sl1yof, p1.
Do not turn; slide stitches to other
end of needle.
Row 4 (WS, CC): Sl1, [brk1,
yf sl1yo] to last 2 stitches, brk 1,
drop CC leaving yarn to back, sl1.
Turn work.
Work in Rodekool Brioche Lace Stitch Pattern until piece
measures 17 inches from ribbed keyhole. The sample
has 77 rows in this section.
Repeat Ribbed keyhole, then continue with lace as per
Middle Lace Area of Scarf. When the third
lace area is the same length as the beginning
lace end, BO using the Italian BO.
|
|
FINISHING
Weave in ends and block. When blocking, do not touch this yarn
with a hot iron, it contains nylon which melts.
|
ABOUT THE DESIGNER
|
Nancy Marchant was born in Indiana but now lives and works, as
a graphic designer, in Amsterdam, the Netherlands. She has written
articles for both Vogue Knitting and Interweave Knits on the brioche
stitch and is the author of Knitting
Brioche.
Find out more about
Nancy and the brioche stitch at her website, .
|
Pattern & images ? 2010 Nancy Marchant. Contact Nancy |
|